Grow · division
How to Divide Chives into Rooted Clumps
Divide common chives in spring. Prepare each new position first, keep five or more bulbs with attached roots in every section, replant at the same depth, water well, and pause harvest for several weeks.
Published Last updated
In this guide
Should you divide an established chive clump?
For a temperate US garden, divide in spring after frost danger has passed. Lift the clump, separate rooted groups using the bulb-and-root check below, and replant at the old soil line in prepared positions. Water them in and leave spring divisions unharvested for several weeks. RHS guidance also allows autumn division; use the regional timing and spacing comparison below before choosing a date.
Division has two distinct jobs in a chive planting: multiplying a healthy plant and resetting a clump whose crowded center or declining productivity has become a practical problem. The appearance of a large tuft is not enough reason by itself. A vigorous clump can stay intact when no additional plants are needed, while a smaller but congested clump may justify renovation because its useful growth has shifted to the perimeter.
Name the job before deciding how many sections to keep. Propagation favors a greater number of qualifying divisions and accepts a slower return to a full-looking clump. Renovation favors fewer, more substantial sections with room to rebuild. This distinction prevents the operation from becoming a contest to produce the highest plant count and gives the gardener a reason to stop separating while each section still has a strong establishment prospect.
How many bulbs and roots should each division retain?
These instructions apply to common chives, Allium schoenoprasum. The plant forms a dense tuft of fine, round, hollow leaves above many small, slender bulbs. Garlic chives, Allium tuberosum, have flat leaves and white flowers. The two herbs may occupy similar garden roles, yet the bulb-count checkpoint here belongs to common chives.
Inspect the pale bulb bases before pulling the clump apart. The leaves can hide narrow joins between rooted groups; follow those joins while supporting the roots. Keep the lifted mass beside its prepared planting positions so each separated group can go straight back into soil.
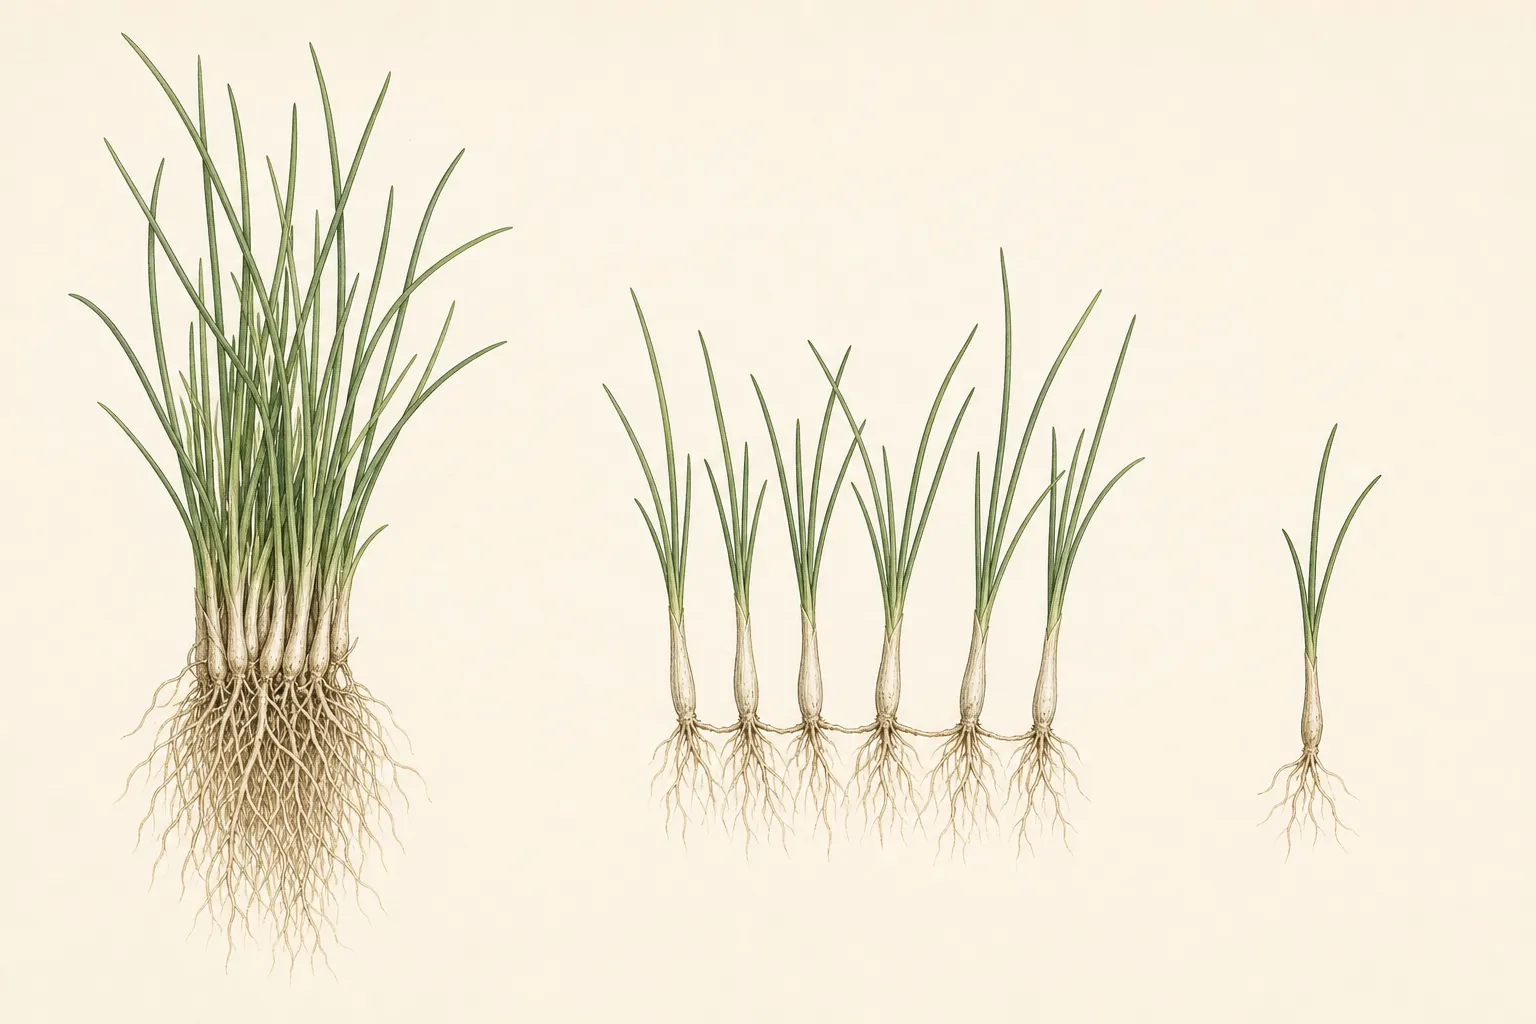
Count bulblets where their pale bases meet the roots. The published numbers are close but not identical: one recommendation calls for at least five bulblets, while another gives four to six. Using five as the floor and five to six as the routine checkpoint follows both. Once that floor is met, the next size decision carries the documented tradeoff between quicker establishment from larger divisions and more propagules from smaller ones.
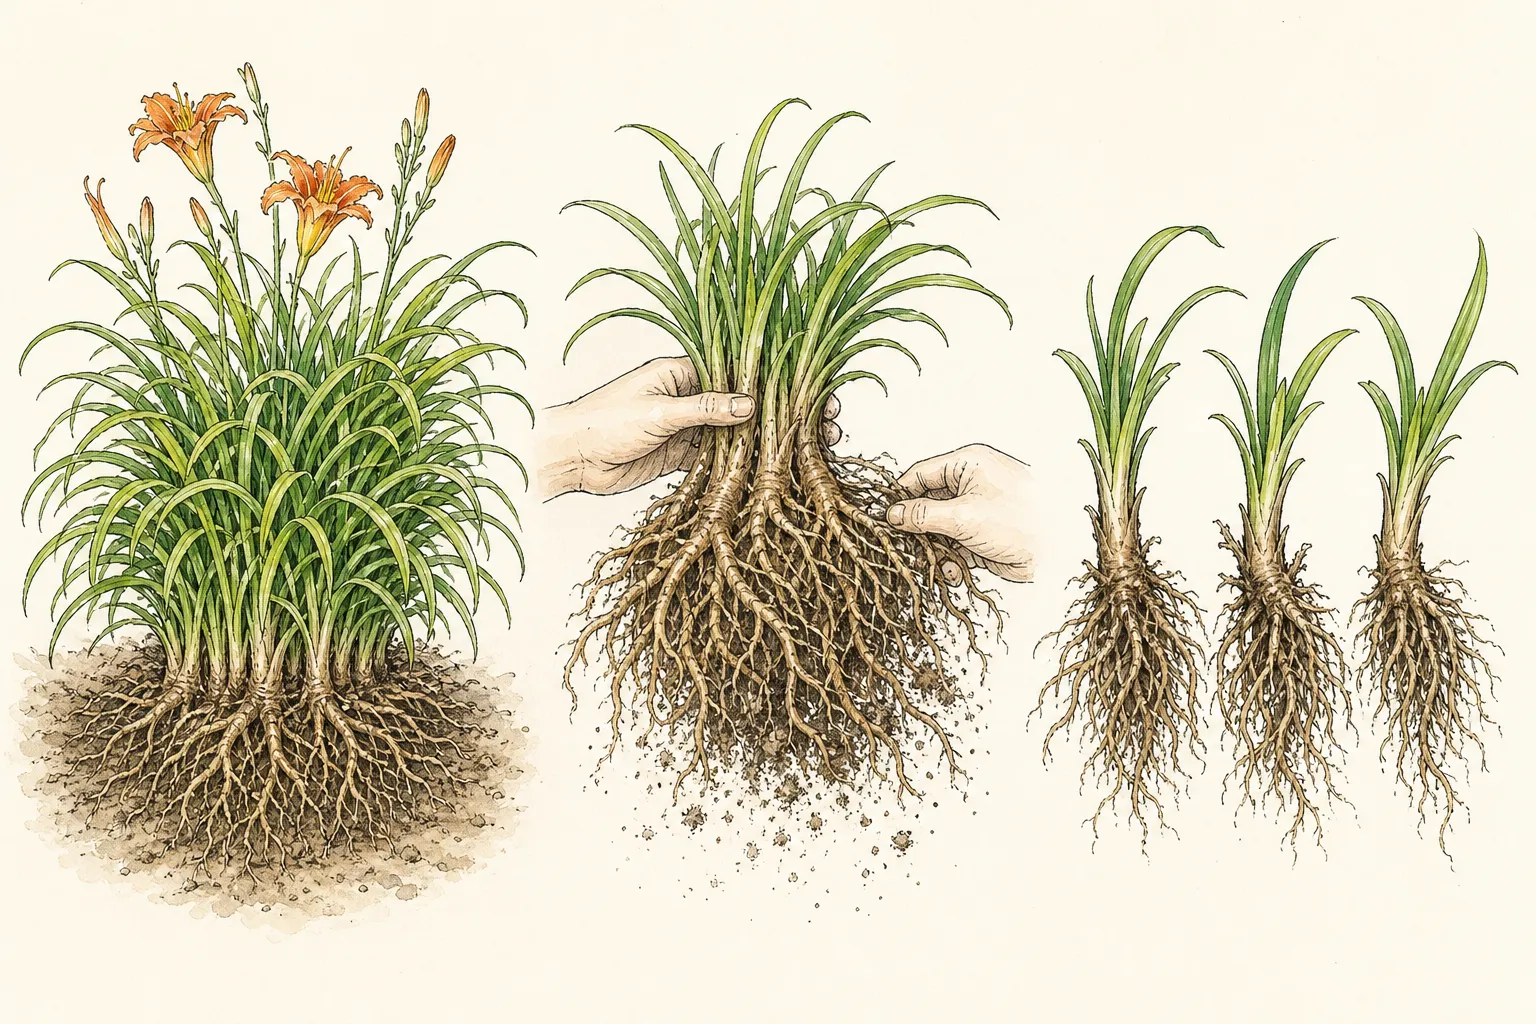
General perennial-division guidance requires shoots to retain a useful portion of the root system. A section that has lost most of its roots needs to remain with a stronger group where possible. Use the anatomy plate below to locate the structures before starting the physical sequence.
When should you divide chives, and how far apart?
For a temperate US garden, spring after frost danger has passed is the clearest default. RHS also allows spring or autumn, while US Extension sources converge on spring and Minnesota supplies the after-frost boundary. The difference is regional scope rather than a contradiction. Use the conservative US window and let local frost history set the calendar.
Division frequency is a response to purpose and clump condition, not a recurring appointment. Published maintenance intervals of roughly two to four years describe common practice, but a vigorous uncrowded clump does not become defective on an anniversary. Renovation becomes relevant when productivity or the center declines; propagation becomes relevant when there is a genuine destination for more plants.
Available space sets a harder limit than the apparent size of the parent. Chive recommendations span close plantings of 4 to 6 inches (10 to 15 cm) and broader clump centers of 12 to 20 inches (30 to 50 cm). Minnesota specifies 6 to 12 inches, Wisconsin 12 to 20 inches, and the RHS illustration uses about 6 inches; compare these as different planting contexts. About 12 inches (30 cm) is a practical home-bed default within those ranges, while edging, containers and deliberately dense systems can justify another documented interval.
Use clump centers to think about density because arching leaves exaggerate the occupied width. A tuft can spill across a path while its crown remains compact, or look modest above soil while crowding develops below. Mapping the future centers reveals whether the intended multiplication fits the existing bed, belongs in another site or exceeds the garden's actual capacity.
Site quality matters more than finding empty ground. Chives favor sun or light shade, fertile soil with organic matter and drainage that retains useful moisture without staying waterlogged. A rapidly drying pocket and a saturated hollow present different establishment risks. Neither becomes suitable merely because a division is available to fill it.
Amendment and fertilizer answer separate questions. Fine compost can improve organic matter where the receiving soil needs it; division alone does not diagnose a nutrient deficiency. An already fertile bed may need no added material. Keeping those decisions separate prevents the transplant event from becoming an automatic feeding treatment unsupported by the site.
Confirm the season, destination count, clump density and soil conditions before any roots are exposed. If one of those limits fails, postponement preserves the parent clump and avoids creating sections whose only destination is an improvised or unsuitable patch.
How many new clumps will fit the bed?
A division plan has three limits before the clump leaves the ground: the purpose of the job, the number of prepared destinations and the recovery speed the gardener is willing to accept. Propagation can justify more qualifying sections because plant count is the objective. Renovation usually benefits from fewer substantial sections, since a quick return to a useful clump matters more than filling every possible space.
The established tradeoff is straightforward. Larger perennial divisions establish and look presentable sooner; smaller ones recover more slowly but produce more propagules. That difference makes the planned destination count a horticultural decision, not merely a matter of arithmetic. A bed with room for three strong clumps does not improve when one parent is converted into six marginal pieces that have nowhere suitable to grow.
The five-bulb floor is an acceptance boundary, not a quota to pursue repeatedly. Once a prospective section is near that boundary, retaining extra bulbs and roots buys establishment capacity at the cost of one possible propagule. A gardener renovating a tired center may reasonably keep broad outer portions, while someone extending an herb edge may choose smaller qualifying groups and accept their slower return.
Uneven sections are not a defect when each one remains viable and fits a prepared position. Chive clumps do not present themselves as identical units, and forcing a symmetrical yield can sacrifice useful root mass for visual neatness. Judge the finished set against its intended use: every destination receives a sound rooted group, no surplus section waits for an improvised home and the parent has not been reduced beyond the recovery plan.
This planning distinction also prevents a common reporting error. The number of new clumps is not evidence of a successful division by itself. Success is a smaller set of claims: the congested plant has been reset or multiplied for a stated reason, the receiving spaces match the chosen density, and the retained sections have enough below-ground structure to establish on the timetable the gardener accepted.
How deep should divisions sit, and what can go wrong?
Most failed divisions can be traced to a mismatch between what was judged above ground and what remained below it. A large fan of leaves can belong to very few bulbs, while an irregular-looking section can carry a strong rooted base. Leaf volume and visual symmetry are therefore weak evidence of viability; the anatomy standard is the more reliable explanation when one section establishes and another does not.
Crown damage has a different signature from ordinary handling. A clump with severed central tissue or heavily stripped roots has lost structure during the operation, whereas bent leaves alone may recover. This distinction matters after the event because extra water cannot replace missing roots, and cosmetic trimming cannot restore a pierced crown.
Depth errors also appear as a relationship problem rather than a leaning-leaf problem. The former soil line records where roots ended and leaf bases began. When that line is buried, the crown sits in a wetter, less aerated position; when roots or bulbs remain exposed, they lose contact with the surrounding soil. The angle of the foliage does not change either condition.
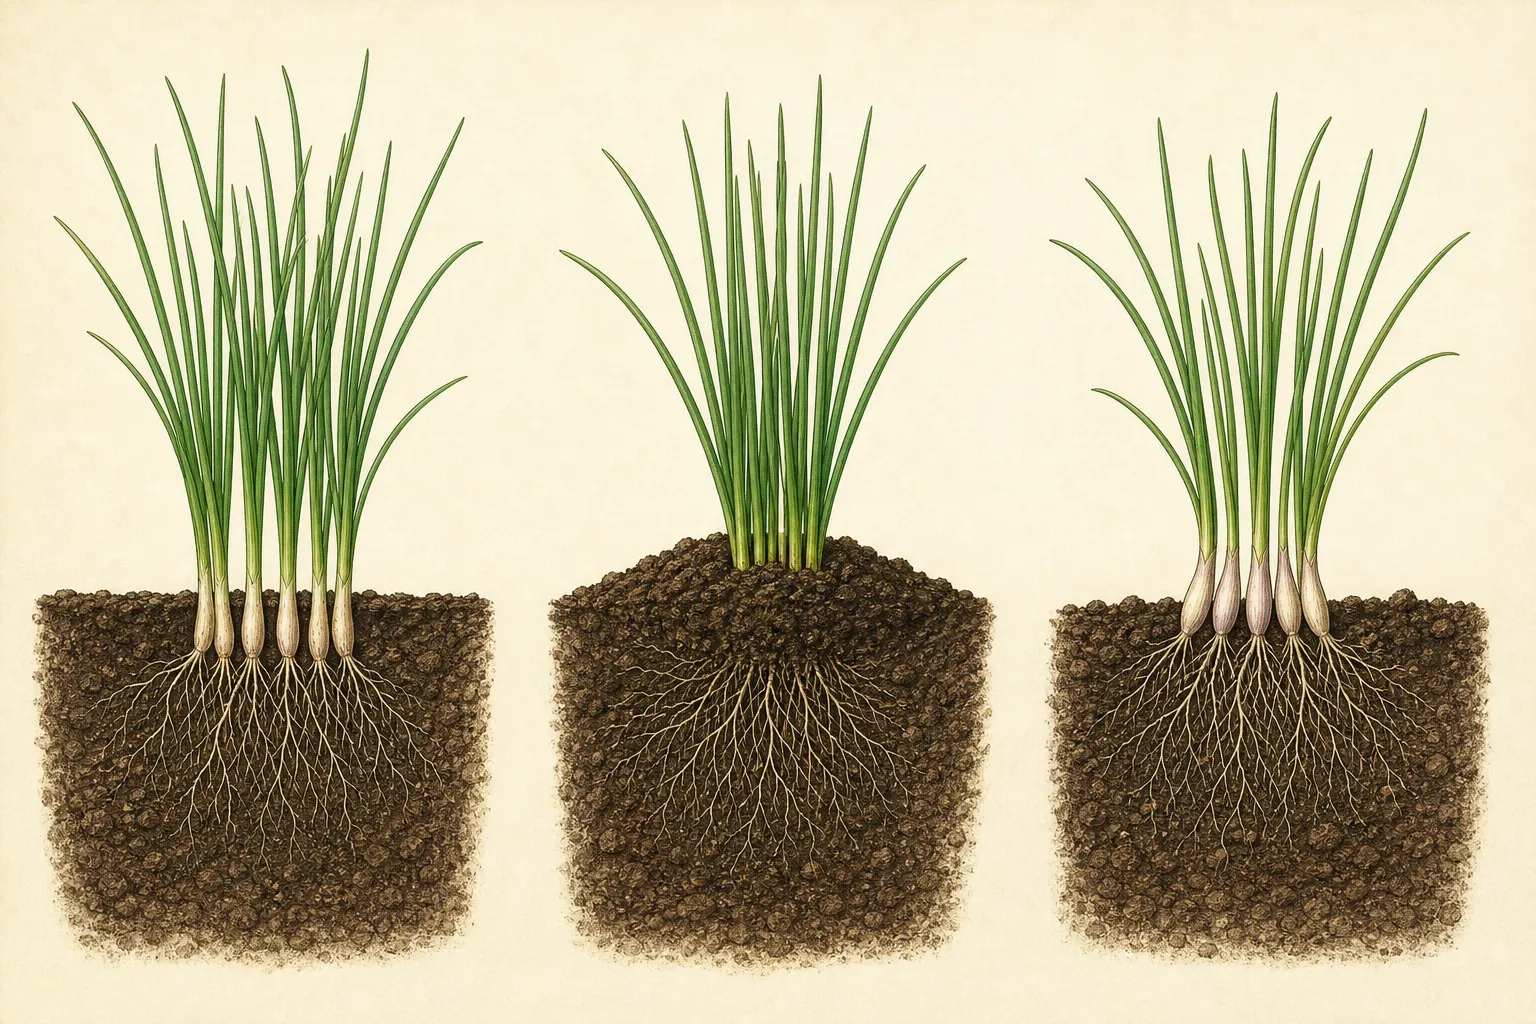
Exposure before replanting is cumulative. Fine roots lose moisture while the gardener finds space or completes another task, and the resulting decline may be blamed later on the new bed. This is why destination readiness belongs to the go-or-wait decision. The parent remaining intact for another day is a better outcome than several qualified sections waiting without a final site.
Read these failures diagnostically if establishment diverges. Compare bulb-and-root substance, crown integrity, the old soil-line relationship and the time roots spent exposed. Watering alone cannot correct a weak division, a damaged crown, a buried growing point or prolonged root exposure.
When can you resume harvesting?
A divided chive may look untidy before it looks established. Leaves handled during lifting can lean or crease even when the below-ground section is sound, so the shape of the old foliage is a poor single verdict. More useful evidence accumulates around the base: the crown holds its level after settling, roots remain covered, water enters rather than ponding and the surrounding soil changes moisture normally between rain or irrigation.
Compare the new groups with one another as well as with the parent clump's former appearance. Similar responses across the bed point toward shared weather or site conditions. One section declining while its neighbors remain steady directs attention to its depth, root coverage or local drainage. That comparison narrows the diagnosis without inventing a universal number of days to recovery.
The several-week protection from harvest is best understood as a change in priority. Existing leaves are no longer the crop that matters most; continuity below ground is. New upright growth that follows stable crown position and ordinary moisture change is stronger evidence than a burst of old foliage immediately after moving. The protected interval gives those signals time to separate from the disturbance of the job itself.
Establishment is therefore a pattern of stable placement, functioning drainage and resumed growth, not a date printed on the calendar. A section that keeps settling, exposes roots or remains in saturated soil has a physical problem even if several weeks have passed. A section that is secure and producing new growth after the protected interval can return to normal use without demanding that every neighboring clump reach the same size on the same day.
Steps
- Level
- easy
- Time
- Replant each section immediately
- Tools
- Garden fork
- Materials
- Fine compost or another soil improver, if the receiving bed needs it
- 1Choose the purpose and spring window
Confirm that the plant is common chives with round, hollow leaves rather than flat-leaved garlic chives. Decide whether the job is propagation or renovation of an overcrowded or less productive clump. In a temperate US garden, schedule division for spring after local frost danger has passed. Postpone lifting until every section you intend to move in this session has a prepared destination.
- 2Prepare all receiving positions
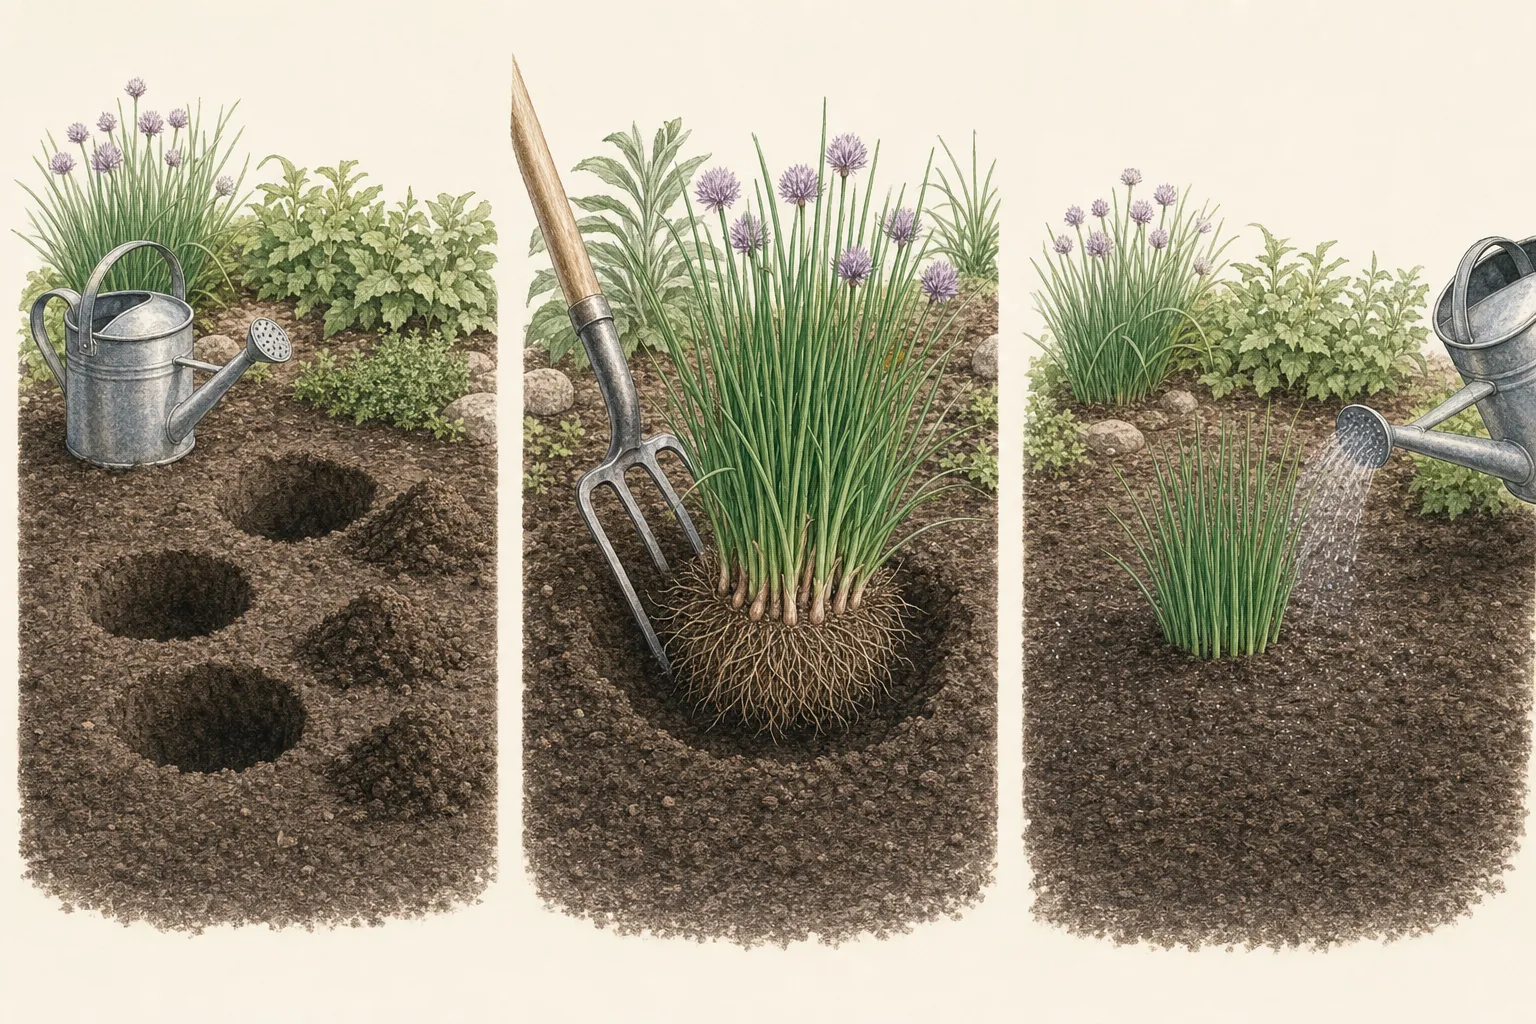
Mark the final positions in sun or light shade and well-drained soil. For an ordinary herb bed, use about 12 inches (30 cm) between clump centers unless the planting has a deliberate closer or wider system. Open every hole wide enough for a rooted group at its former depth, prepare loose backfill, add fine compost only when organic matter is needed, and place water nearby. Before proceeding, confirm that every intended section can be planted and watered immediately without setting exposed roots aside.
- 3Lift from outside the crown
Place a garden fork beyond the outside edge of the crown and work around the clump. Ease the shallow rooted mass upward in stages instead of levering from one point. Once lifted, support the clump and loosen only enough soil to see the small bulbs, natural seams, and attached roots. If the mass remains anchored, widen the lift around the perimeter instead of driving the tines through the center. Keep accepted sections moving directly to the next step.
- 4Pull apart rooted sections
Begin at an outer seam and pull a group away by hand. Retain at least five bulbs and a useful portion of the root system in each accepted section. Pause after every separation to count at the bulb bases and inspect both root portions. If another pull would leave either side below that floor, strip away most roots, or require force through a resistant seam, keep the larger rooted group intact and move it to a prepared destination.
- 5Replant at the original depth
Move each accepted division straight to a prepared position. Set it at the depth at which the parent clump was growing, spread the attached roots into the hole, and cover them with the reserved soil. Keep the crown or leaf bases at the surrounding grade. Firm gently enough to support the section and finish all backfilling before applying water. Check from the side as well as above: no roots should remain exposed, and extra soil should not bury the crown to straighten leaning leaves.
- 6Water each section in
Water thoroughly after backfilling, then check that settling has not pulled the crown below grade or uncovered roots. Correct the level while the soil is workable. During establishment, inspect the root zone rather than the surface alone, and water deeply when rain is infrequent and the soil around the shallow roots is drying. Let that soil check, rather than a fixed weekday schedule, decide the next watering.
- 7Pause harvest during establishment
Leave spring divisions unharvested for several weeks and keep their root zones from drying. During that interval, correct exposed roots or a crown that settled below its former level and water when the root zone is drying. After the protected period has passed, return the clumps to ordinary harvesting without inventing a precise first-cut date.
Related reading
Sources
- Growing chives in home gardens. University of Minnesota Extension. Source record · Accessed 2026-08-16.
- Chives, Allium schoenoprasum. University of Wisconsin–Madison Division of Extension. Source record · Accessed 2026-08-16.
- Chives. University of Illinois Extension. Source record · Accessed 2026-08-16.
- How to Grow Chives in Your Garden. Utah State University Extension. Source record · Accessed 2026-08-16.
- Chive. UC Marin Master Gardeners, UC Agriculture and Natural Resources. Source record · Accessed 2026-08-16.
- Perennials: dividing. Royal Horticultural Society. Source record · Accessed 2026-08-16.
- How to grow chives. Royal Horticultural Society. Source record · Accessed 2026-08-16.
- How to Divide and Transplant Perennials. Iowa State University Extension and Outreach. Source record · Accessed 2026-08-16.
- Perennials. University of Connecticut Home Garden Education Office. Source record · Accessed 2026-08-16.