Grow · tool hygiene
Cleaning Pruning Shears: When Disinfection Is Needed
Remove soil, sap, and plant debris first. Known disease exposure adds a separate, label-controlled disinfection step before drying and pivot care.
Published Last updated
In this guide
- Cleaning and disinfection solve different problems
- Clean first and use disease risk to trigger disinfection
- Stage the work before opening the blades
- Remove debris and sap from the full cutting assembly
- Keep the clean tool out of the dirty path
- Use exposure, not habit, to trigger disinfection
- Let the current label control the chemical step
- Protect the edge from the treatment itself
- Dry, lubricate and test before storage
- Use the final cut to diagnose what cleaning did not fix
- Steps
Cleaning and disinfection solve different problems
Clean pruning shears when soil, sap, or plant debris collects on the blades and pivot. Add disinfection after cutting a visibly diseased plant, before moving from infected tissue to a susceptible plant, or when the tool returns from another garden site. The exposure decision determines whether ordinary tool care needs a separate chemical step.
Cleaning removes the material that makes blades sticky and leaves surfaces accessible. Disinfection addresses disease-transfer risk on an already clean surface. Applying a disinfectant over dirt is unreliable because organic debris can shield parts of the metal, while a bright-looking blade may still require disinfection after a relevant exposure.
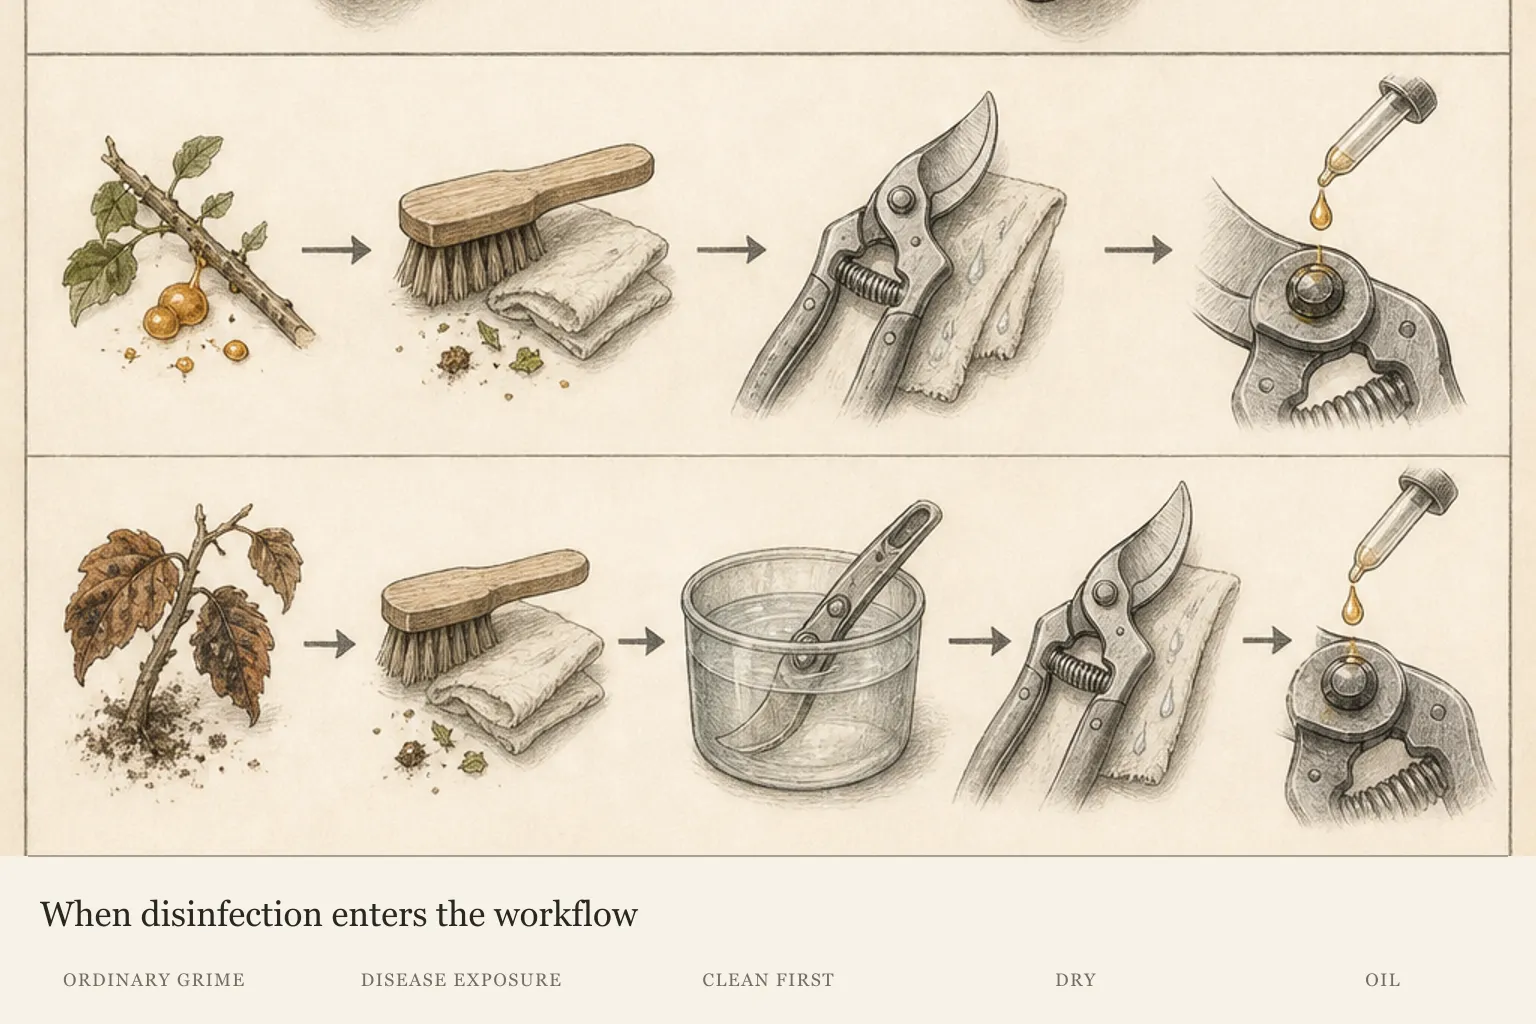
Keep the sequence stable even though products and tools differ: remove loose material, clean the blade and joint, assess exposure, use a compatible labeled disinfectant when triggered, dry every wet surface, and care for the pivot. Reversing that order can waste disinfectant, trap moisture, or leave residue where the blades overlap.
Routine sap removal does not need to be described as disinfection. Conversely, vigorous scrubbing is not a substitute for the added step after disease-risk contact. Naming the job accurately helps the gardener choose the correct supplies and prevents a familiar maintenance wipe from being treated as complete hygiene in a higher-risk situation.
Clean first and use disease risk to trigger disinfection
Remove sap, soil and plant debris before deciding whether a disease-related disinfection step applies. Follow the compatible method and product directions already specified, then dry the whole assembly before lubrication and storage. A blade that looks clean can still have moisture or residue at the pivot, so confirm movement and inspect those hidden areas before closing the tool.
Stage the work before opening the blades
Choose a stable, well-lit work surface before handling the cutting edge. Set out the brush, cloths, cleaning solution, compatible sap remover if needed, and tool oil. If disease exposure triggers disinfection, read the selected product label first so its ventilation, protective equipment, preparation, contact, rinsing, drying, and storage requirements can shape the workspace.
Inspect the closed shears before cleaning. Note visible soil, plant fibers, hardened sap, corrosion, damage, and the places where the blades overlap. Open and close the handles once with care to locate a sticky pause or uneven movement, then close and lock the tool before brushing. This baseline separates a residue problem from an edge or mechanical defect that cleaning may not solve.
Keep clean and dirty cloths distinct during a disease-risk session. Material removed from the shears should not be transferred back after the surface has been cleaned. Contain plant fragments and used cleaning material according to the product directions and the nature of the debris, keeping the work away from children, vulnerable adults, and active garden traffic.
Treat the blade path as hazardous throughout the task. A locked tool is safer for the first brushing pass, but the overlap and pivot may require deliberate repositioning later. Place hands on the handles or blunt exterior surfaces, move slowly, and return the shears to the closed and locked position whenever open access is no longer needed.
Remove debris and sap from the full cutting assembly
Brush away loose soil and plant fragments while the blades are closed and locked. Warm water with soap or detergent can handle ordinary grime. Work from the broad faces toward seams and the joint so removed material leaves the tool rather than collecting deeper in the overlap.
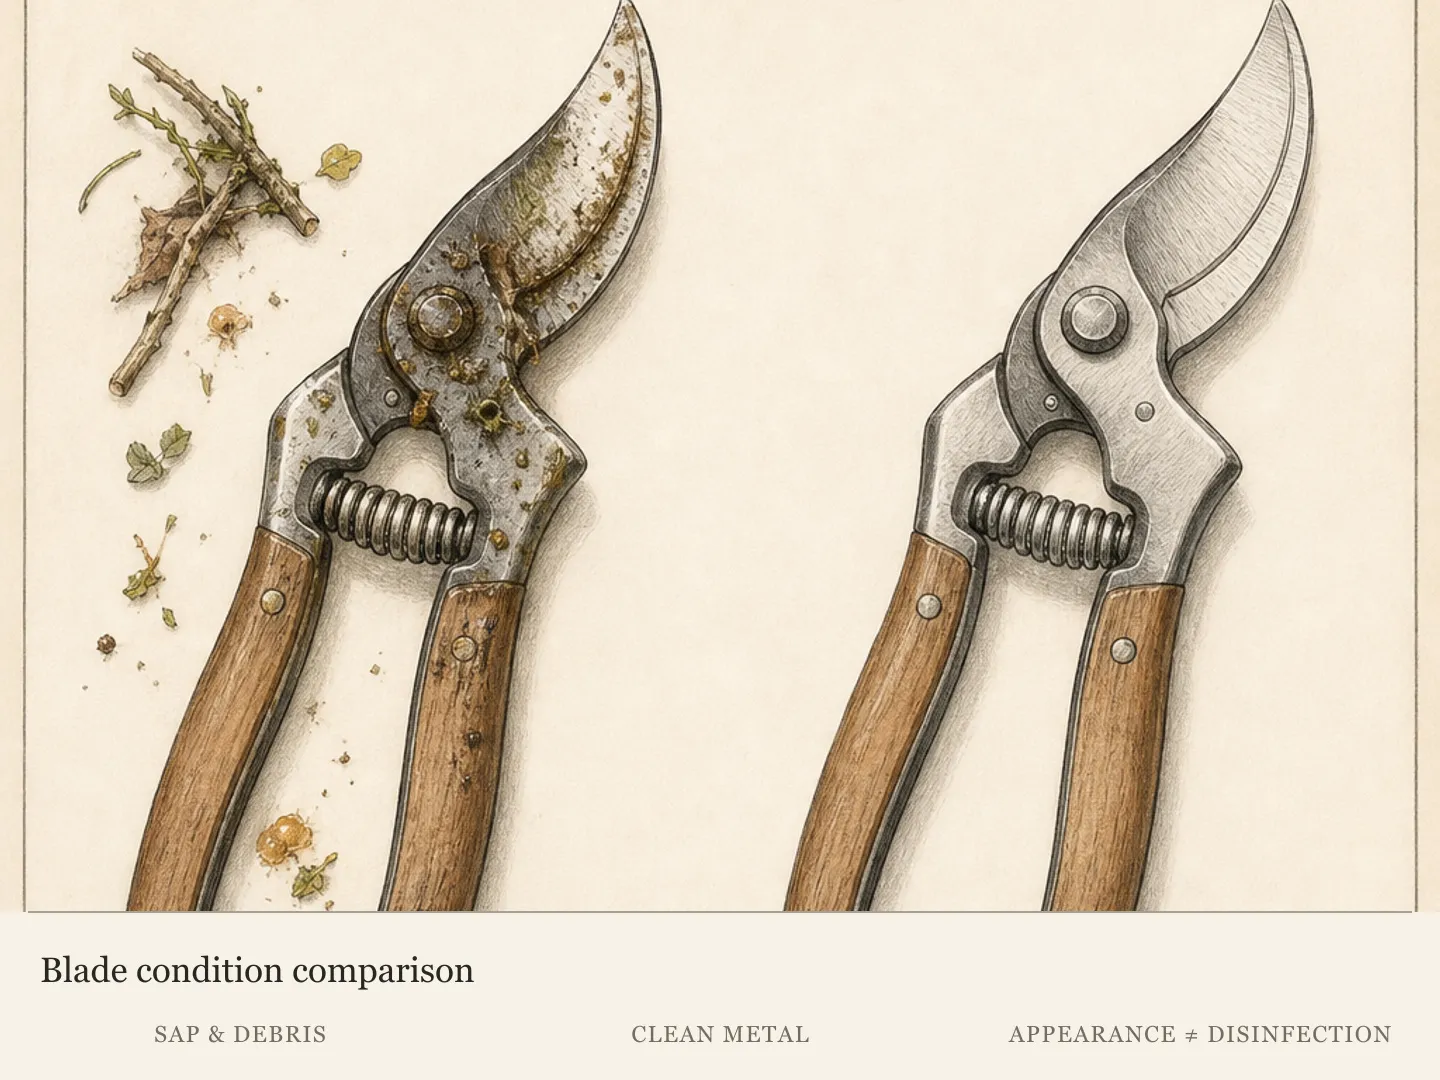
Dried sap may need a nylon scourer and a small amount of a penetrating or water-displacing product compatible with the tool's finish. Give the product time and friction only within its directions; flooding the pivot is unnecessary. Wipe away loosened residue so the cutting faces do not retain an oily film that can attract more debris.
Open the shears cautiously when the closed position hides the blade overlap. Clean the accessible metal, then change the angle and repeat. Sap in this narrow zone can create a sticky action after the visible edge looks clean, and plant fibers near the pivot can reappear as the blades move.
Inspect before proceeding. The blade faces, back surfaces, overlap, pivot area, spring, and accessible handle junctions should be free of visible soil, sap, and fragments. If residue remains, repeat the cleaning method suited to that material. Disinfection belongs after this checkpoint, not on top of material that can block surface contact.
Keep the clean tool out of the dirty path
Arrange the work so removed material moves in one direction, away from the shears. A brush, scourer, and cloth used on the initial soil and sap should not touch a disinfected surface later. Place the cleaned tool on a fresh section of the workspace before the chemical or drying stage, and keep plant fragments from being swept back toward it.
Handle one disease-risk tool through the complete sequence before opening another when the space is small. This makes it easier to distinguish dirty supplies from clean ones and to maintain the selected product's contact period. If several tools share a station, separate their parts and records so no shear is stored after receiving only part of the required process.
Pay attention to hands and grips as well as the blade. Touching a dirty cloth and then lifting a cleaned tool can return debris to the handles or metal. Follow the product label for glove changes or hand cleaning, and finish the workstation only after the locked dry shears have moved to their storage location.
Use exposure, not habit, to trigger disinfection
The strongest trigger is direct work on a visibly infected plant. Disinfect before the tool moves from that tissue to another susceptible plant, even within the same pruning session. Clean first whenever sap or fragments are present, since speed between cuts does not change the need for an accessible surface.
Cross-site use adds another trigger. Soil and plant fragments can travel on tools borrowed between gardens or carried home from another property. Clean and disinfect the shears before they enter the next planting area, then keep the finished tool separate from the cloths and debris generated during the dirty stage.
Ordinary pruning of apparently healthy material still calls for cleaning when sap impairs movement or before storage. It does not automatically require a chemical disinfectant after every cut. This risk-based routine limits unnecessary chemical handling while preserving the added response for exposures identified by institutional hygiene guidance.
Uncertainty should lead to a conservative pause, not an improvised chemical recipe. If a plant problem is unresolved and the shears may move to a vulnerable specimen, stop the sequence, keep the tool contained, and seek disease or local Extension guidance. The eventual disinfectant choice still follows its current label and tool compatibility.
Let the current label control the chemical step
A disinfectant name is not a complete instruction. Products sold under a familiar active ingredient can differ in concentration, permitted surfaces and required handling, and those differences determine whether a garden-tool use is supported. The current container label is therefore the controlling source; an old recipe or a contact interval copied from another formulation cannot fill gaps in it.
Selection begins with two separate questions. The product must allow use on the kind of hard surface being treated, and the shear material must tolerate that use without damage to coatings, plastics or the cutting edge. A product that answers only one question is not yet a suitable choice. Compatibility uncertainty belongs at the selection stage, before any liquid reaches the tool.
Contact time is formulation-specific rather than a number to average across institutional guides. A shorter interval from one product and a longer interval from another do not combine into a safer middle value. The same principle applies to dilution, ventilation and post-treatment handling: each belongs to the chosen product system, not to disinfectants as a generic category.
Hazards also change the workspace decision. A flammable product excludes ignition sources, while another formulation may impose different protective or ventilation requirements. Mixing products creates an unreviewed chemical combination and can introduce harmful fumes or skin exposure. If the available workspace cannot meet the labeled conditions, defer the chemical step or choose a product whose directions can be followed as written.
Keep the container and its label available until the job and cleanup are complete. That preserves the information needed if a spill, disposal question or unexpected material reaction occurs. Proceed only when the label supports the product, tool material and workspace as a compatible combination.
Protect the edge from the treatment itself
Bleach is a poor default for pruning blades because University of Minnesota Extension warns that it can corrode metal and pit a sharp cutting edge. That warning does not establish one universal replacement. It reinforces the need to match a labeled disinfectant to the tool material and exposure task.
Watch the entire assembly for compatibility, not only the blade face. Coatings, handle materials, springs, pivot hardware, and lubricated joints may respond differently to prolonged wetting or a chemical product. Use the application method allowed by the label and the tool maker, and keep treatment confined to surfaces that need it.
Rinse only when the selected label directs it. An unnecessary rinse adds wet work, while skipping a required rinse leaves the process incomplete. In either case, the shears must move from the product-specific finishing instruction to thorough drying without returning to a dirty cloth or contaminated work surface.
Inspect the edge after treatment and drying. New discoloration, roughness, pitting, or resistance at the pivot signals a compatibility or moisture problem that should be resolved before pruning resumes. Cleaning cannot repair a damaged edge; sharpening, adjustment, or replacement remains a separate decision.
Dry, lubricate and test before storage
The pivot is the last place to judge by appearance alone. Water or residue can remain between overlapping metal even when the blade faces look dry, then emerge when the joint moves. That hidden moisture matters because storage turns a brief wet condition into prolonged contact. Inspect recesses, the spring and fasteners as parts of the same drying problem rather than treating the cutting edge as the whole tool.
Lubrication solves friction at the joint, but excess oil creates a different maintenance burden. A heavy film on blades or grips attracts soil and plant fragments and can make handling less secure. The useful result is confined to free movement where metal bears on metal. Oil is not a substitute for removing sap, drying trapped moisture or correcting a damaged blade alignment.
Compare the finished movement with the baseline recorded before cleaning. A sticky pause that disappears points to removed residue; resistance that remains at the same point may indicate misalignment, wear or damage beyond routine cleaning. Moisture expressed from the joint means drying is incomplete, even if the first inspection seemed satisfactory. This comparison turns the final check into diagnosis rather than ceremony.
Storage conditions preserve or undo the work. A dry tool placed beside wet cloths, plant debris or an open chemical area can be recontaminated before its next use. The secure location should separate the shears from the waste side of the cleaning station and prevent accidental access to an open blade. The structured maintenance item below gives the concise finish sequence; these observations explain what each finish condition proves.
Use the final cut to diagnose what cleaning did not fix
A clean, freely moving shear should still be assessed during its next appropriate cut. If the blades crush, tear, or require abnormal force after sap and pivot resistance are gone, the remaining problem may involve the edge, adjustment, wear, or damage. Repeated washing will not correct those mechanical conditions.
Keep the maintenance record simple: note the exposure trigger, cleaning products, disinfectant used when applicable, and any compatibility or movement issue. This record is especially useful for tools that move between sites because it shows whether the cross-site hygiene sequence was completed before storage or reuse.
Set the future routine from actual use. Clean after sticky sessions and before seasonal storage; disinfect promptly after identified disease-risk contact and before the tool moves to a susceptible plant. End every wet procedure with the same observable checks: no visible residue, no retained moisture, smooth pivot movement, a wiped blade, and dry locked storage.
Steps
- Level
- easy
- Time
- One short maintenance session, plus label contact and drying time
- Tools
- Stiff brush, Nylon scourer, Clean cloths, Small oil applicator
- Materials
- Soap or detergent, Tool-compatible sap remover if needed, Label-approved disinfectant if disease risk is present, Light tool oil
- 1Decide whether disease risk is present
Before setting up, identify the last plant and site the shears contacted. Plan routine cleaning for sap, soil, and grime. Add the separate disinfection stage after visibly diseased tissue, before moving from infected material to a susceptible plant, or when the tool returns from another garden. Contain the tool while an uncertain disease exposure is being clarified.
- 2Stage a safe cleaning station
Choose a stable, well-lit surface away from children and garden traffic. Set out the brush, nylon scourer, clean cloths, soap or detergent, compatible sap remover if needed, and tool oil. If disinfection is triggered, read the product label and arrange the required ventilation, protective equipment, contact period, rinsing or drying stage, and chemical storage before opening the blades.
- 3Remove debris, sap, and grime
Close and lock the blades, then brush off loose soil and plant fragments. Wash ordinary residue with water and soap or detergent. Use a nylon scourer and a compatible penetrating or water-displacing product for dried sap, then wipe the surface clear. Reposition the tool cautiously to clean the overlap and pivot while keeping hands outside the cutting path.
- 4Confirm that the surface is ready
Inspect both blade faces, their back surfaces, the joint where they cross, the pivot area, spring, and accessible handle junctions. Open and close the shears carefully to expose hidden residue, then repeat cleaning while any soil, sap, or fibers remain. Move to disinfection only after the relevant surfaces are visibly clean.
- 5Disinfect when the trigger applies
Use a disinfectant whose current label permits the hard surface and whose compatibility has been checked for the tool. Follow that label's preparation, concentration, application, wet-contact time, ventilation, protective equipment, rinsing, drying, storage, and disposal directions. Never mix products, and keep a flammable option away from flames, sparks, and ignition sources.
- 6Dry every part of the assembly
Complete the label-directed finishing step, then remove moisture from the blade faces, backs, overlap, pivot, spring, fasteners, and handles. Use clean cloth surfaces and inspect recesses after cycling the joint. If air drying is required, secure the open tool until dry, then close and lock it before the next stage.
- 7Lubricate, test, and store
Place a small drop of suitable tool oil at the dry central pivot. Work the handles several times, wipe excess from blades and grips, and confirm smooth movement without a sticky pause. Inspect for moisture or residue expressed from the joint, close and lock the shears, and store them dry away from dirty cleaning supplies.
Related reading

Sources
- Clean and disinfect gardening tools and containers. University of Minnesota Extension. Source record · Accessed 2026-08-30.
- Cleaning hand tools. Royal Horticultural Society. Source record · Accessed 2026-08-30.
- How do I sanitize my pruning shears?. Iowa State University Extension and Outreach. Source record · Accessed 2026-08-30.
- Safe plant propagation and plant sales. Oregon State University Extension Service. Source record · Accessed 2026-08-30.