Grow · pruning
Pruning English Lavender at the Live-Growth Boundary
Prune established English lavender and lavandin while leafy shoots remain below every cut, shaping after bloom and delaying uncertain dead-stem decisions until live growth is clear.
Published Last updated
In this guide
- Let living foliage set the depth
- Let living leaves define the safe shortening boundary
- Confirm that routine shaping is the right job
- Use flowering and climate to choose the main window
- Read the transition from shoots to old wood
- Build the outline from conservative sectors
- Treat dead stems and crown decline as separate decisions
- Use the next shoots as the quality check
- Steps
Let living foliage set the depth
Prune established English lavender and lavandin after the main flower flush by removing spent stalks and shortening shoots only where living foliage remains below the cut. The leaves are the boundary. A stem that carries green shoots beneath the blades retains visible growth from which the plant can continue; a cut pushed into rigid, leafless old wood may leave a gap that does not refill.
That boundary is three-dimensional and uneven. The sunward shoulder of a mound may carry leafy growth farther down than an older, shaded, or damaged section. Follow individual stems from the spent spike toward the center, and stop while flexible leafy tissue is still present. A single horizontal cutting plane ignores the plant's internal architecture and turns a modest shaping pass into a series of deeper cuts on whichever side has the highest old wood.
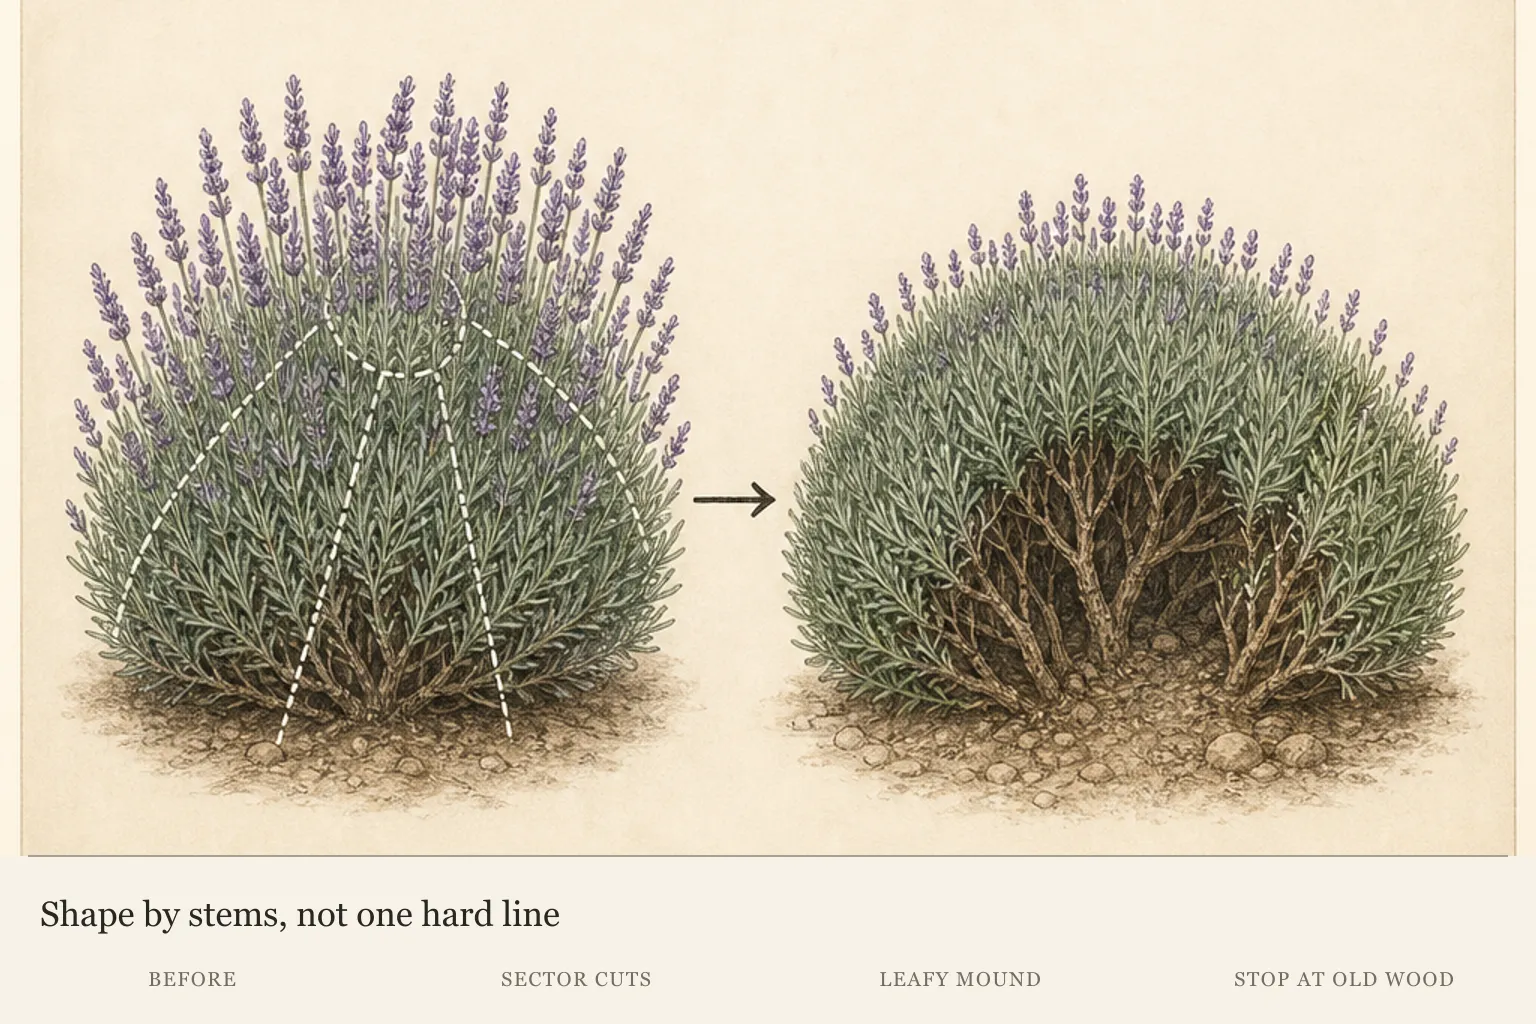
The finished outline therefore comes from many safe stem decisions. It may be rounded without being mathematically even, and one side may remain higher where the leafy shell is shallow. Preserve that living difference. The purpose of the pass is to remove the completed flower display and shorten green extensions while keeping a viable shell around the woody framework; a perfectly level surface has no value if achieving it exposes bare stems.
Let living leaves define the safe shortening boundary
Confirm the lavender type and trace several stems before cutting. Remove spent stalks and shorten appropriate leafy shoots only where living foliage remains below the cut. If a proposed cut enters bare old wood, revise the approach. Review the retained rounded shell before another pass, then separate ordinary root-zone care from any automatic response to pruning.
Confirm that routine shaping is the right job
This method is scoped to established English lavender and lavandin. It does not cover Spanish or French lavender, formative pinching of a very young plant, or emergency treatment of a crown that is actively collapsing. Confirm the plant type before borrowing its pruning response, then inspect the plant's present condition. A named pruning date cannot make an unhealthy crown or an unidentified lavender ready for routine shaping.
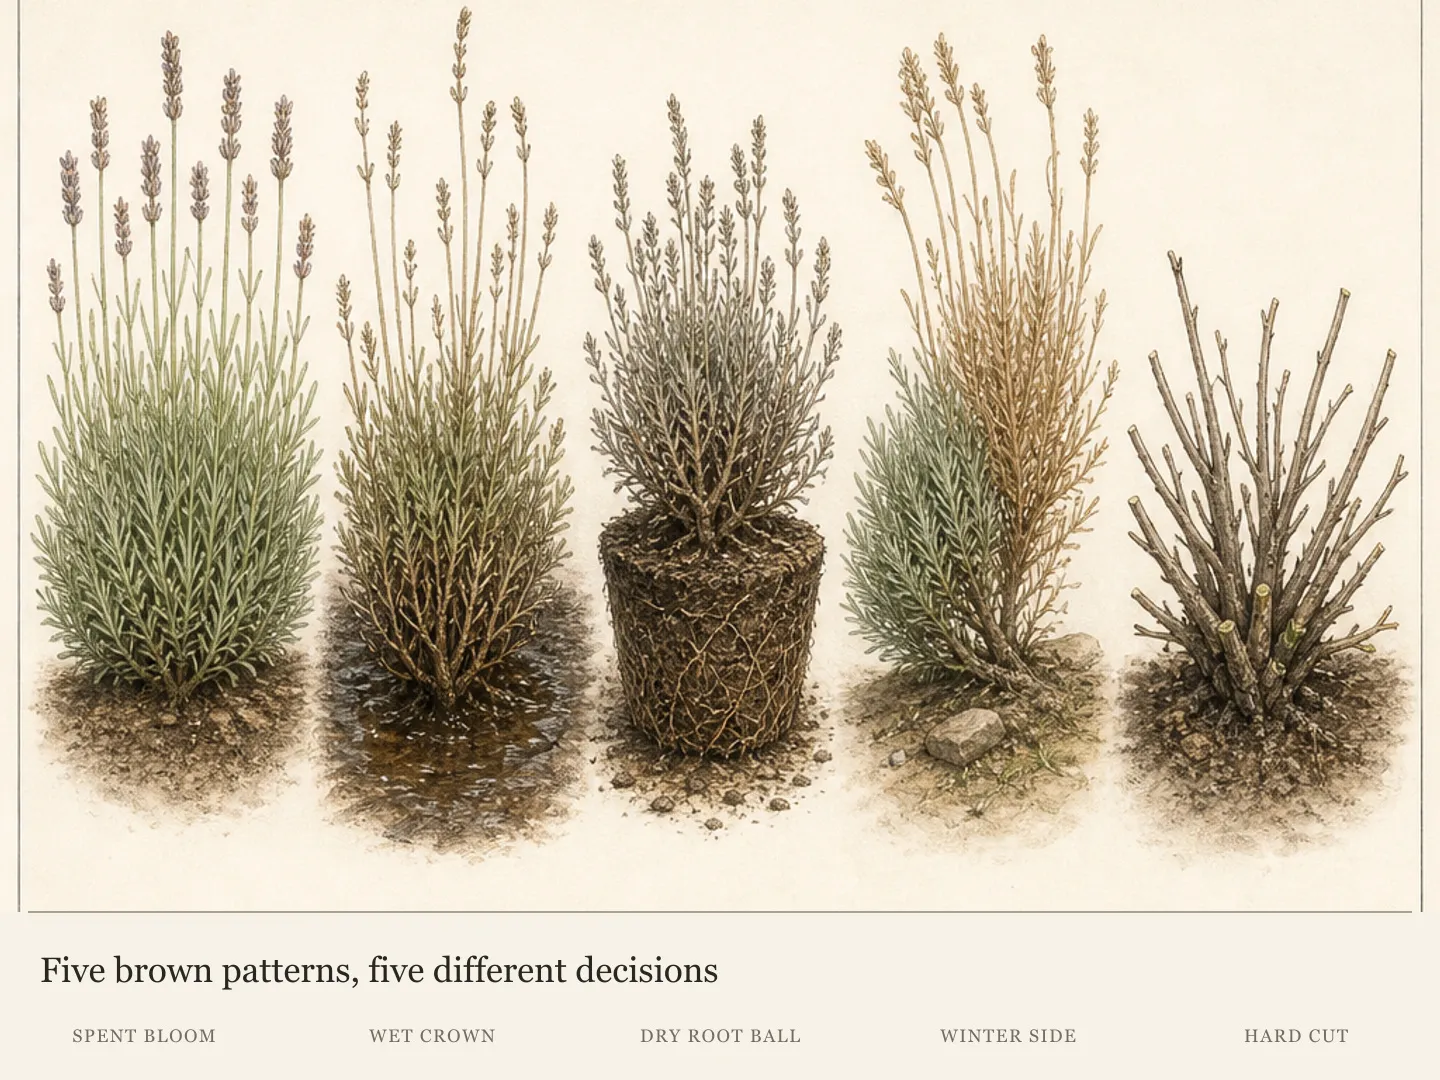
Look at the base before working on the flowers. A firm crown, a root zone that is not staying saturated, and visible leafy shoots support an ordinary pruning pass. A dark, soft crown, stems that detach easily, or wet soil that persists after nearby ground drains changes the problem. Put the pruners aside and diagnose the decline, because shortening the canopy cannot correct a failing root zone or crown.
Separate harvest from pruning as well. Cutting selected flower stems for use can occur while other spikes remain in bloom, but structural shaping asks how much living leafy length exists across the entire mound after the principal display. Finish the flower harvest you want, allow the remaining bloom to reach its end, and make the broader decision with the woody framework and green shell visible. This keeps a product harvest from quietly becoming a deep, poorly timed shear.
Use flowering and climate to choose the main window
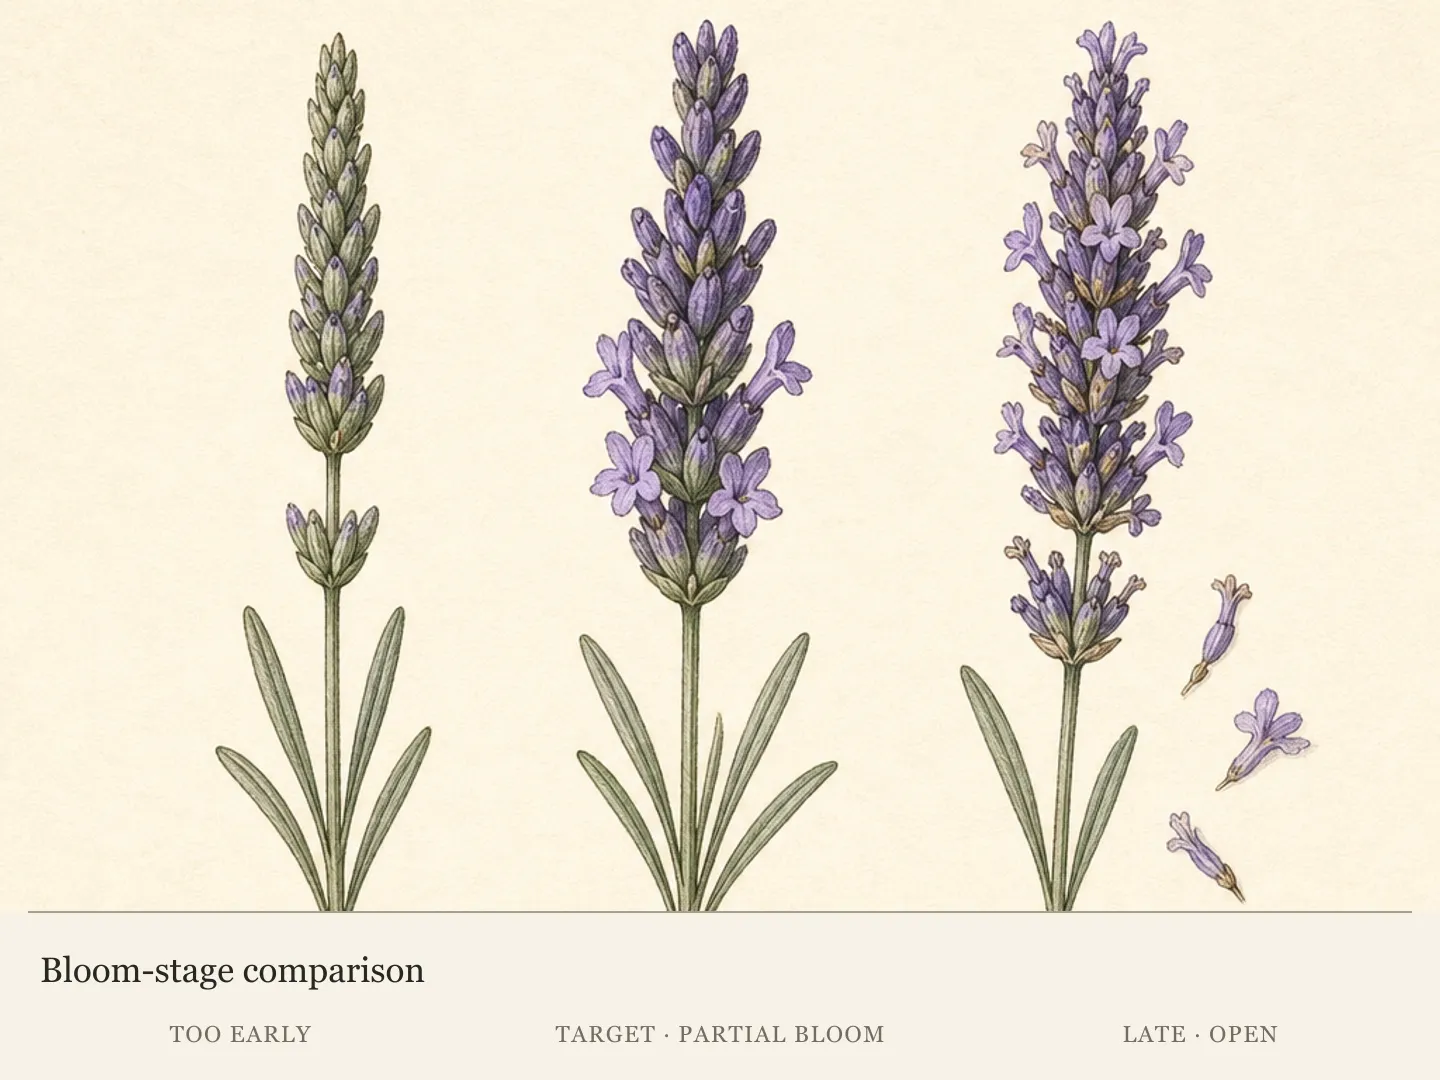
The main shaping window follows the flower flush while the current shoots are green. At that point spent stalks distinguish the material that has finished blooming, and the remaining leaves show how far each stem can be shortened. Pruning then also leaves the living outline available for inspection. The calendar supplies context, but bloom stage and visible green tissue authorize the work.
Readiness has both a seasonal and a botanical part. A plant can have many brown flower stalks yet still be a poor candidate if its lower shoots are obscured by winter uncertainty or the crown is declining. It can also show clear leafy extension while a few later flowers remain, in which case selected harvesting may continue without forcing the structural pass. Begin shaping when the principal flush is complete enough to reveal the mound, current growth is identifiable around the plant, and local cold does not make a late deep correction prudent. If those conditions do not coincide, choose the smaller action: remove selected spent stalks within the leafy zone and reserve the full outline for the clearer window. This distinction prevents a calendar reminder from overruling the evidence on the stems.
Cold-winter gardens call for greater restraint late in the season. Do not force a substantial shaping pass when the remaining green shoots have little seasonal margin before cold weather. If the main flowering period ends late under local conditions, remove what can be removed conservatively and leave uncertain structural decisions for spring, when buds and new shoots can reveal the survival line.
Winter injury can also make spring the first reliable diagnostic moment. Gray or straw-colored stems may include both dead portions and living tissue lower down. Wait until growth clarifies the boundary, then trace each questionable stem to a living junction or leafy shoot. This delay is useful information gathering, not neglect: it prevents a visually damaged side from dictating cuts into healthy tissue elsewhere on the plant.
Read the transition from shoots to old wood
Begin with several sample stems before making a shaping cut. Follow a spent flower stalk down into flexible green growth, then farther toward the rigid framework. Leaves become sparse and the stem surface changes as the shoot joins older wood. Locate that transition on the top, shoulders, and lower sides of the mound. The shallowest green zone shows where the outline will need to rise or bend.
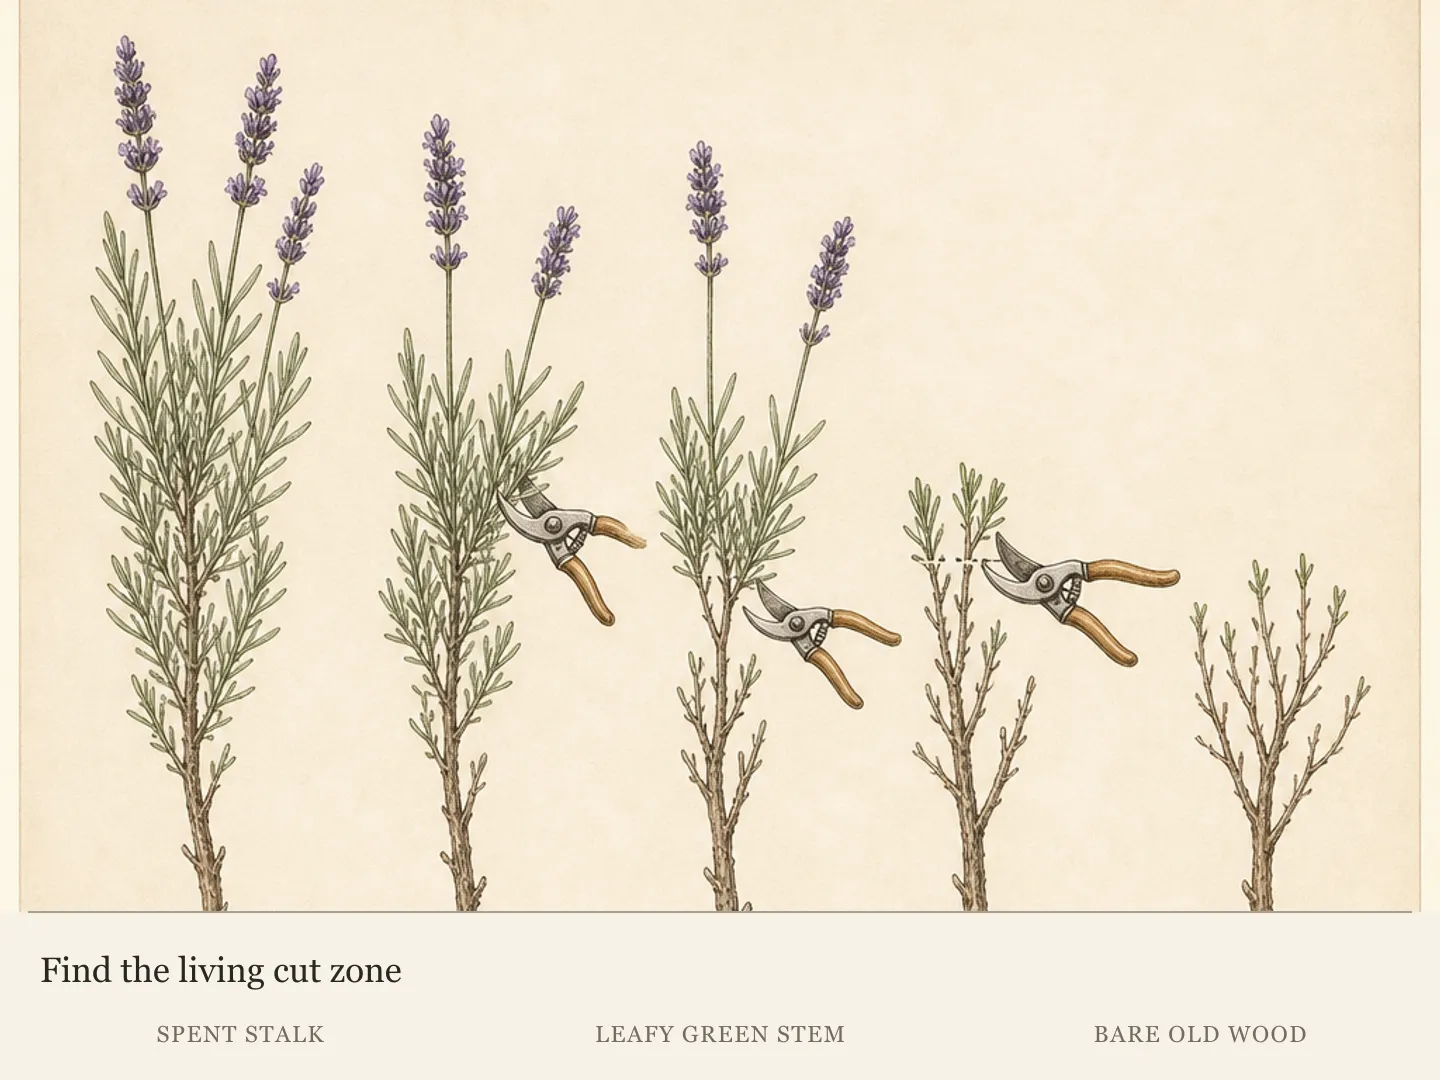
A living side shoot below the proposed cut is a useful checkpoint. It confirms that the stem continues into active foliage beneath the blades and gives the remaining section a clear place in the green shell. When the nearest leaves sit only at the end of a long bare segment, moving the cut inward for neatness would cross the boundary. Retain more length there, even if adjacent stems can safely be shortened farther.
Old wood is normal inside an established lavender. Its presence is not itself a command to remove it, and exposing more of it does not rejuvenate the mound. Treat the woody center as the framework the current leafy shoots must cover. Dead fragments can be addressed when confirmed, but a sound bare branch that supports living growth belongs to the plant's structure even when it prevents a tight dome.
Map the boundary with your eyes and hands before committing to the full pass. Lift a few flowering stems, note where flexible growth ends, and compare that point around the circumference. This survey takes longer than setting one cutting height, yet it reduces later correction. Once a deep gap has been made, surrounding stems cannot be shortened to erase it without sacrificing more living foliage.
Build the outline from conservative sectors
Remove the spent flower stalks first, taking only a small amount of green stem and leaving visible leaves below each cut. This clears the vertical clutter and reveals the leafy mass that actually needs shaping. It also prevents flower-stalk height from becoming the reference line for the shrub beneath it. Step back after this first pass and read the plant again before shortening the longer green shoots.
Choose a conservative cut on one of the longest leafy shoots, then use it as a local guide rather than a level carried around the entire plant. Work in small sectors so the boundary can change as the framework changes. Keep the center slightly higher and taper the shoulders where living foliage allows, creating a rounded shell through connected local decisions.
Pause at every hollow, split, or high patch. If completing the curve would require cutting the edge of a hollow back into bare wood, let the outline detour around it. If one sector contains shorter green shoots after damage, shape that sector at its own living height and blend the neighboring foliage gradually. The eye accepts a modest asymmetry more readily than the plant repairs a forced opening in old wood.
Review the mound from several sides before taking a second pass. Long stems that genuinely interrupt the outline can be shortened while their leafy bases remain obvious. Small differences hidden within the green surface need no correction. Repeatedly trimming the whole plant to catch a few remaining extensions lowers every safe section and increases the chance that the blades eventually cross into the framework.
Treat dead stems and crown decline as separate decisions
A brittle stem with no living side shoot can be removed to a live junction when one exists. Trace it before cutting. A dead tip attached to a leafy lower section calls for a limited cut, while a branch that disappears into the crown without a visible living connection needs more cautious assessment. Removing confirmed dead fragments is precise cleanup; it is not a reason to match every neighboring stem to the same depth.
Uncertain winter-damaged stems can remain until spring growth makes the distinction visible. Watch for buds or short green shoots along the lower portion, and compare the exposed side with sheltered growth. Once a live junction appears, the dead segment above it has a clear endpoint. If no live tissue becomes evident, remove only the confirmed dead path and retain healthy sectors at their own safe height.
Browning that advances from the crown demands a different sequence. Dark soft tissue, easily detached stems, or a root zone that stays wet after nearby soil drains points beyond routine canopy management. Stop shaping, investigate the drainage and crown condition, and use the dedicated browning diagnosis. Any decision to retain or remove framework should follow that assessment, because pruning alone cannot reverse a saturated root zone.
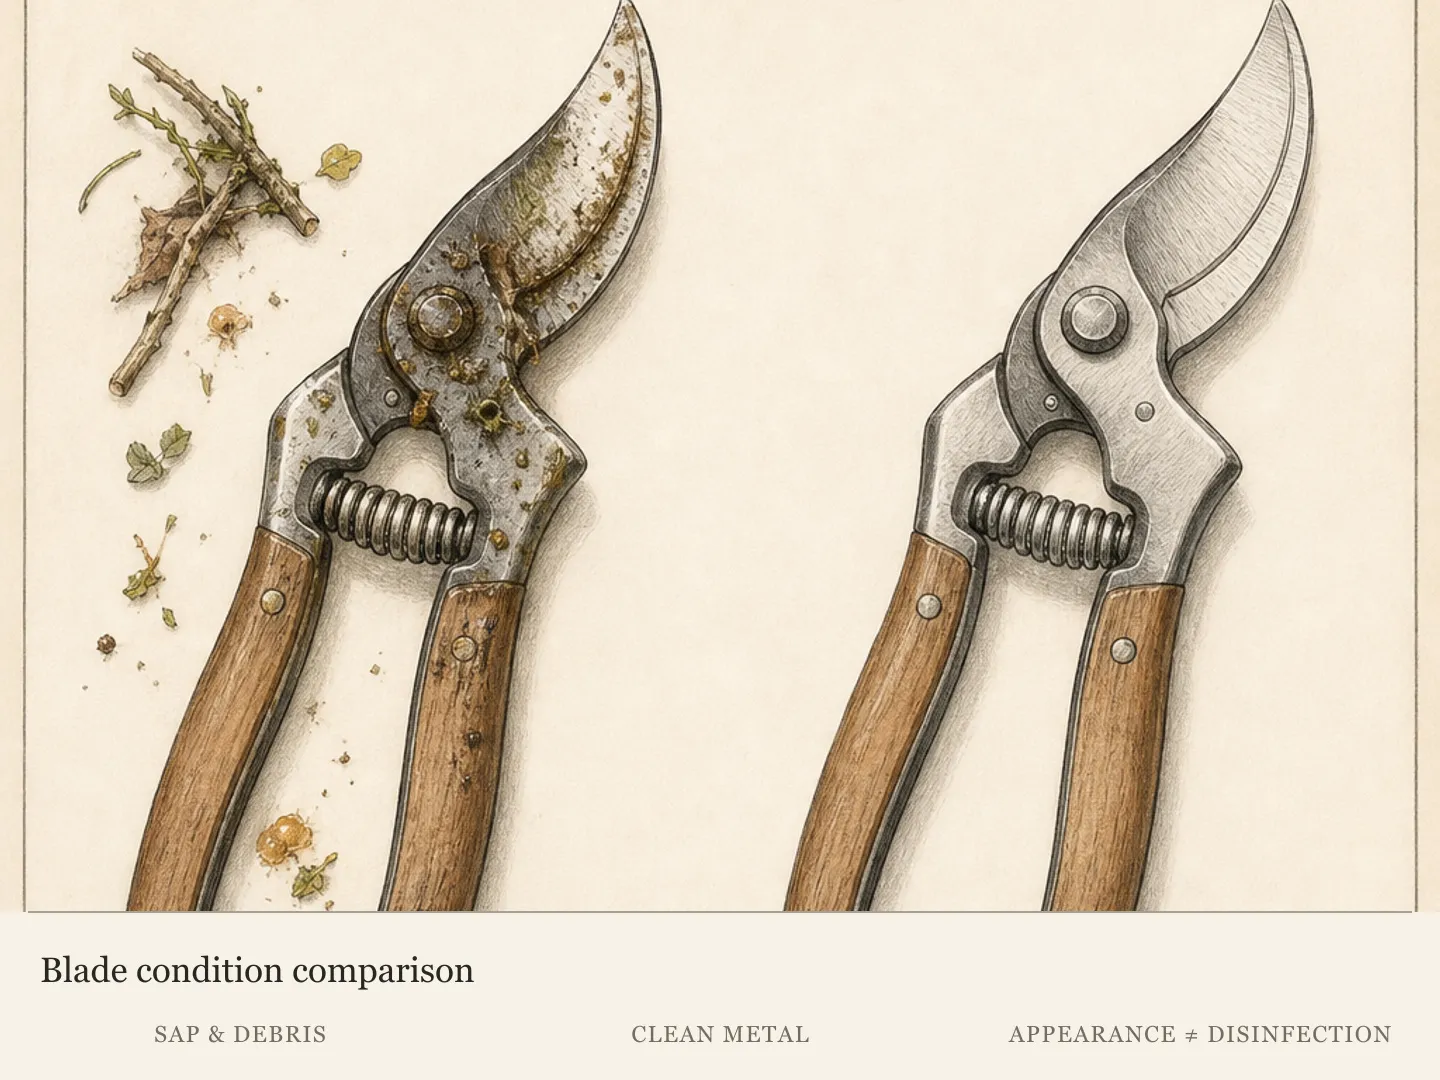
Tool hygiene matters when moving away from a plant with suspected crown or root disease. Clean and disinfect the cutting tools before using them on healthy lavender, and keep questionable debris separate from ordinary spent stalks. For routine work on a sound plant, clear cut pieces from the crown so they do not obscure later observations of the base.
Use the next shoots as the quality check
After pruning, leave irrigation and fertilizer decisions tied to the root zone and normal plant condition. The pruning date alone does not prove that the lavender needs either input. Clear the crown, inspect the living shell, and allow the retained foliage to show how the plant responds. A stable mound with leaves below the cuts is the immediate checkpoint; short new shoots beneath those cuts provide the later confirmation.
Do not judge the session by whether every stem ended at the same visual line. The stronger measure is continuity of living foliage around the framework. A higher shoulder, an old central gap, or a conservatively retained side can remain part of a healthy plant. Photographing the outline after the work can make the later distribution of new shoots easier to compare without prompting more cutting on the same day.
Reassess isolated brittle stems during active growth, when live and dead tissue are easier to distinguish. Remove a confirmed dead fragment to a living junction and stop there. If browning begins at the crown or spreads while the root zone remains wet, return to diagnosis. If green shoots appear below the pruning cuts, preserve them; they are the evidence that the live-growth boundary was respected.
The next season begins with the structure left by this one. Pruning while current extensions remain connected to a visible leafy shell makes each later decision clearer. Waiting until long shoots add another outer layer can move the desired outline farther from the living boundary. The practical goal is a repeatable, conservative relationship between the flowered shoots and the green framework, not a one-time attempt to force an old plant back to a youthful size.
Steps
- Level
- moderate
- Time
- One careful shaping session; duration varies with plant size and winter damage
- Tools
- clean, sharp bypass pruners, small tray or basket for cut stems
- Materials
- No additional materials
- 1Confirm the lavender type and condition
Identify the plant as established English lavender or lavandin. Inspect the crown and soil before touching the flower stalks. Postpone routine shaping if the crown is dark or soft, stems detach easily, the root zone remains saturated, or living growth cannot yet be distinguished from winter damage. Use a diagnosis workflow for active decline and a species-appropriate method for Spanish or French lavender.
- 2Trace several stems to living foliage
Sample stems from the top, shoulders, and lower sides. Follow each spent spike into flexible leafy growth, locate a living side shoot below the proposed cut, and continue inward only far enough to recognize the rigid, sparsely leafed old wood. Compare these transition points around the mound. Mark the shallowest leafy sectors mentally so the finished outline can rise around them.
- 3Remove the spent flower stalks
Cut each spent flower stalk with a small amount of green stem attached. Keep visible leaves below the blades and adjust the depth one stem at a time. Clear this vertical flower material before deciding how much of the leafy mound needs shortening. Harvest any usable flowering stems separately so collecting flowers does not become an unplanned structural shear.
- 4Shorten the longest leafy shoots
Choose one long shoot whose leafy boundary is clear and make a conservative cut above living foliage. Work around the plant in small sectors, using each sector's own safe depth. Shorten only the extensions that interrupt the emerging outline. Step back between sectors so repeated correction of a few long stems does not gradually lower the entire mound.
- 5Preserve a rounded leafy shell
Keep the center slightly higher and taper the shoulders where green growth permits. Detour around old hollows, high woody branches, and shallow leafy areas. Stop whenever continuing the curve would expose bare wood or remove the last living side shoot below a cut. Accept a higher or fuller sector when that is the shape required to preserve a continuous leafy shell.
- 6Review the outline before a second pass
Step back and inspect the mound from several sides after the first circuit. Shorten only the remaining long shoots whose leafy bases are clear. Leave small height differences inside the green surface and preserve higher sectors where old wood limits the safe depth. If correcting one gap would require lowering healthy neighboring foliage, stop the shaping pass with the living shell intact.
- 7Remove only confirmed dead fragments
Trace brittle stems independently of the shaping line. Remove a dead tip to a living junction when one is visible, while retaining healthy neighboring stems at their own height. Leave gray or straw-colored winter-damaged sections in place until spring buds clarify the survival boundary. Clean and disinfect tools before moving from suspected crown or root disease to a healthy plant.
- 8Clear the crown and monitor regrowth
Remove cut debris from the base and keep the crown visible. Leave watering and fertilizer decisions tied to root-zone evidence, not the pruning session. Over the next active-growth period, look for short new shoots below the cuts and reassess isolated brittle stems. Spreading browning from a soft or persistently wet crown returns the plant to diagnosis; green shoots confirm that living foliage was retained.
Plants in this guide
Related reading
Sources
- Growing Lavender in Colorado. Colorado State University Extension. Source record · Accessed 2026-08-16.
- How to Grow English Lavender in Your Garden. Utah State University Extension. Source record · Accessed 2026-08-16.
- Lavender Growing Guide. Royal Horticultural Society. Source record · Accessed 2026-08-16.