Tools · soil testing
Home Garden Soil Tests: Match the Test to the Decision
A home garden soil test should answer a defined decision, from a narrow pH question to a recommendation-bearing or specialized analysis.
Published Last updated
In this guide
- Write the decision before ordering the test
- Separate routine fertility from specialized screening
- Read the deliverable before paying
- Draw zones that preserve meaningful differences
- Let the laboratory control collection details
- Interpret recommendations within their crop and unit basis
- Investigate a surprising result before changing the bed
- Build a baseline that can survive the next test
- Compare laboratories against the intended decision
- Tool notes
Write the decision before ordering the test
Choose a home garden soil test by completing one sentence before comparing packages: “When the result arrives, I need to decide whether to ____.” The missing action might be applying lime, changing a fertilizer plan, investigating an unusual patch, or documenting a baseline. A test is useful when its measurements and interpretation can support that particular decision.
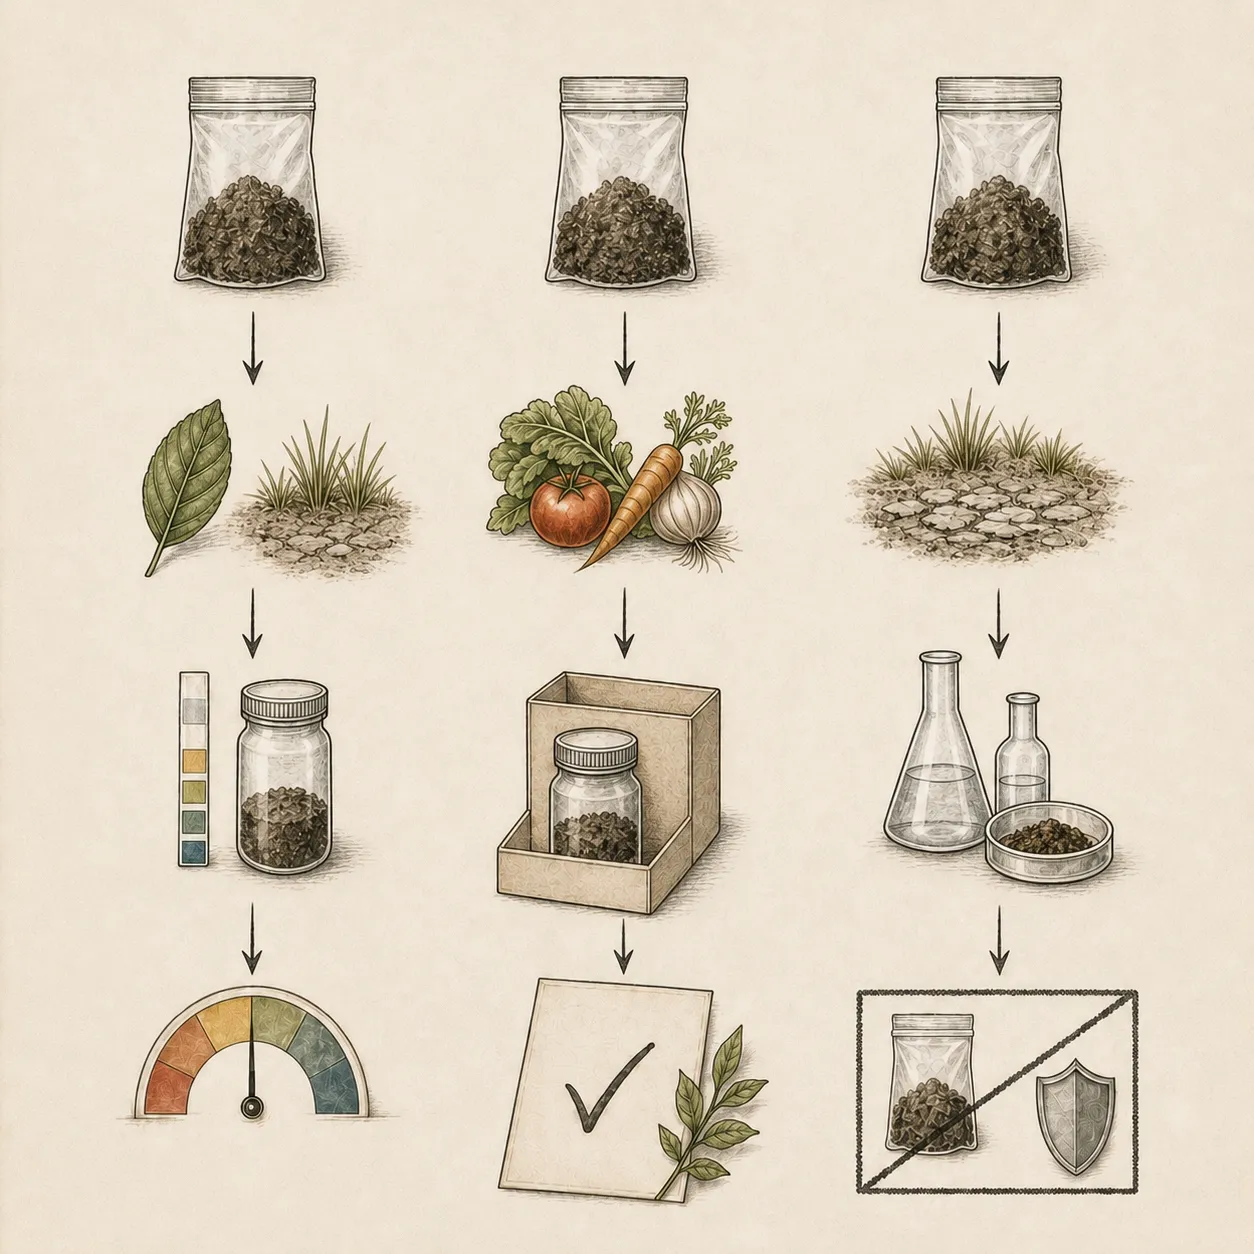
A narrow acidity question may need only a local Extension pH service. A decision about lime, fertilizer, compost, or persistent fertility usually calls for a laboratory package that reports the relevant measurements and supplies recommendations for the intended planting. The distinction matters because a pH value describes acidity or alkalinity; it does not provide a complete nutrient assessment or a crop-specific amendment plan.
Write down the planting type as part of the question. Laboratories use the named crop, lawn, vegetable garden, or ornamental planting to frame recommendations, so a generic submission can return less useful guidance than an accurately described one. If several beds will be managed differently, they may require separate decisions and separate samples even when they are close together.
Delay sampling when the decision is still vague. A report cannot decide whether a weak plant is suffering from shade, damaged roots, poor drainage, insects, disease, or watering. Soil analysis can clarify selected chemical conditions in the submitted sample, but it is only one part of diagnosis when the visible problem could have several causes.
Separate routine fertility from specialized screening
Routine garden packages commonly address pH and selected fertility indicators, but their exact contents vary. They are designed to inform soil-management decisions, not to certify that soil is free of every possible contaminant. Lead, soluble salts, and other specialized concerns may require an added analysis, a different extraction method, special handling, or a laboratory that performs that work.
Treat a contamination or exposure concern as a separate path from ordinary fertility testing. Contact the laboratory and the appropriate local Extension or health authority before collecting. Describe the site history and the decision the result must support, then ask which method, container, sampling pattern, and handling instructions apply. A routine nutrient value cannot serve as a health clearance.
A visibly poor area also needs a comparison plan. Sampling only the affected patch may show that it differs, but there is no ordinary reference from the same garden. When the laboratory advises diagnostic comparison, label the problem zone and the apparently normal zone separately. Keep each composite within its own boundary so the contrast is not erased during mixing.
Home meters and color kits may be convenient for a narrow screen, yet they are generally unsuitable for detailed nutrient diagnosis. When a result could trigger substantial lime, sulfur, fertilizer, or compost use, choose a laboratory method appropriate to local soils and backed by interpretation. The cost of the report should be judged against the amendments and management changes it may prevent as well as those it may recommend.
Read the deliverable before paying
Package names such as “basic,” “complete,” and “garden” are labels chosen by individual laboratories. Compare the current analyte list, sample quantity, fees, turnaround, mailing rules, and interpretation service behind the name. Optional tests should be selected because they answer the written decision, not because a longer list appears more comprehensive.
Ask to see an example report. Locate the measurement table, the units, the stated reference or interpretation, and the section that converts results into an action for the planting type you will submit. A report that supplies numbers without recommendations may still suit a trained adviser, while a home gardener planning amendments usually needs a clear interpretation path.
Check how the laboratory wants the crop or use recorded. The same measured value can lead to different management advice for different plantings, and the submission form carries that context into the report. If the form does not offer an obvious category, ask which choice best represents the bed instead of selecting an unrelated crop merely to complete the field.
Review the laboratory's current instructions on timing and recent amendments. A test taken after an unrecorded fertilizer, compost, or lime application can be difficult to compare with an earlier result. At minimum, preserve the date and amendment history with the sample record so the eventual interpretation is tied to the conditions that produced it.
Draw zones that preserve meaningful differences
Make a simple map before taking soil. Lawn, vegetable bed, perennial border, raised bed, and a low or persistently wet area should not automatically become one composite. Separate areas with different crops, soil history, drainage, or amendment history because a blended result can describe none of them well enough to guide management.
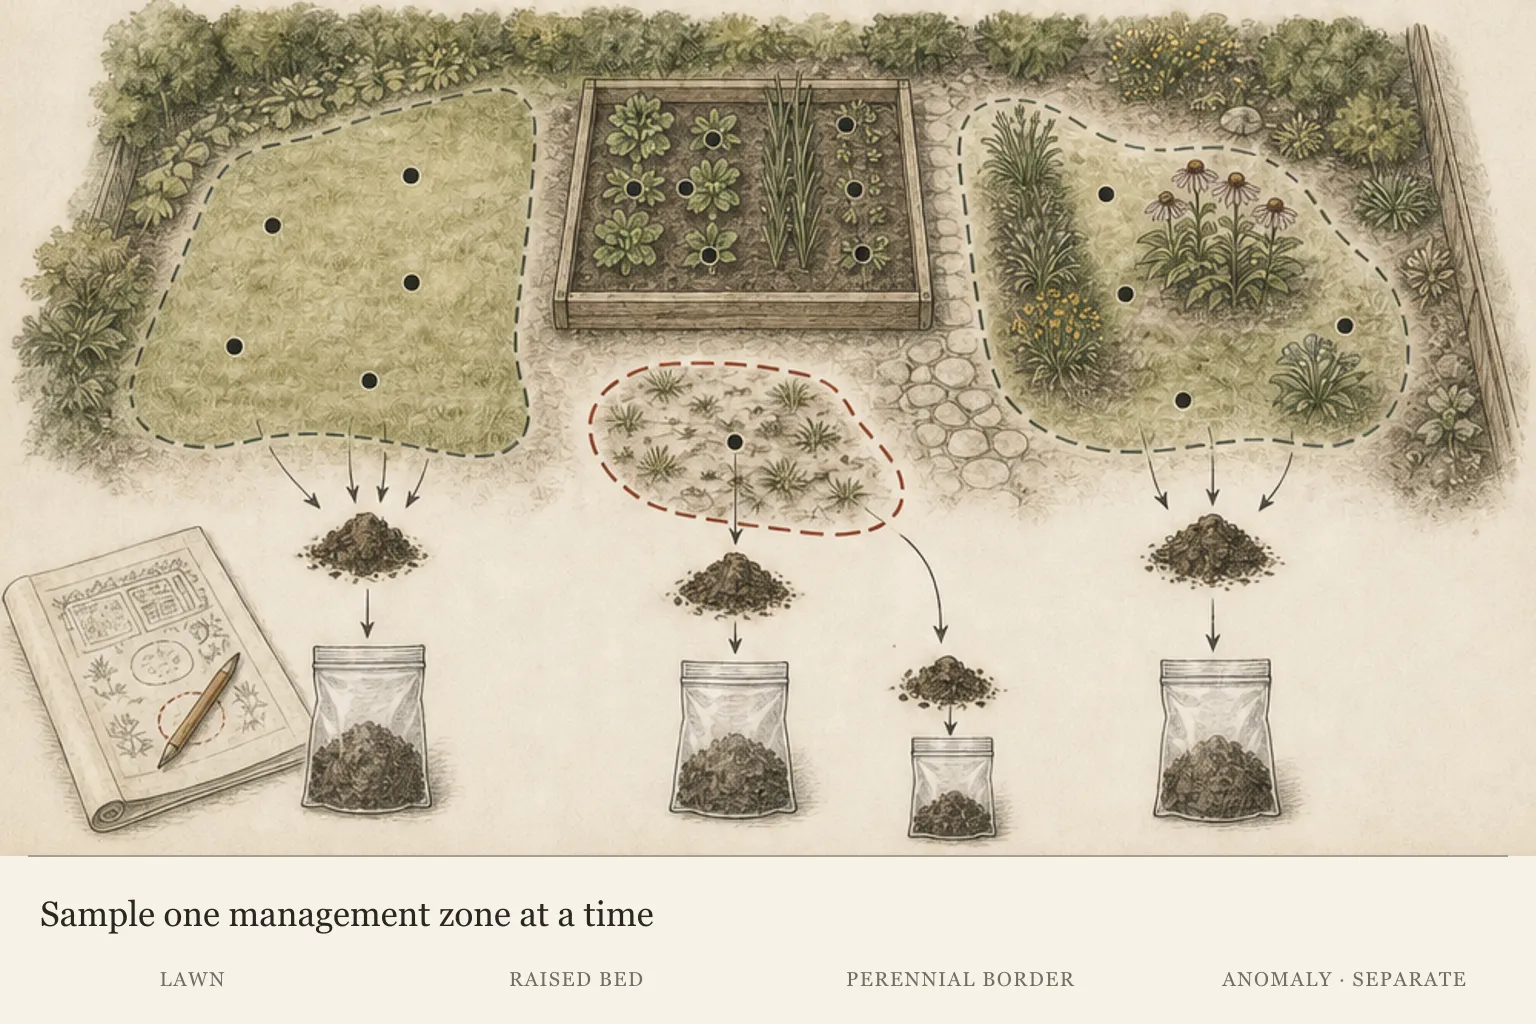
Define each zone at the scale of the decision. A bed managed as one unit can be represented by subsamples distributed through that bed. Two adjoining beds should remain separate when one receives compost and vegetables while the other supports unamended perennials. Proximity does not outweigh a different use or treatment history.
Keep tiny anomalies out of a routine composite unless the anomaly is the question. An old manure pile, fertilizer spill, compost heap, burn area, or narrow strip beside a road can pull the mixed result away from ordinary bed conditions. Mark that location on the map and seek a separate diagnostic or specialized sample if it matters.
A problem patch and its comparison area need independent labels. Mixing them creates an average that may conceal the difference the gardener is trying to understand. Give the zones plain IDs that fit on both the map and submission bag, then photograph or describe fixed boundaries that can be found again after planting obscures the soil surface.
Let the laboratory control collection details
Read the selected kit or submission instructions from beginning to end before breaking ground. Laboratories specify the number of subsamples, collection depth, acceptable tools, preparation, submitted quantity, container, and form. Those details vary with planting type and analysis, so a blended rule borrowed from another service can make the sample incompatible with the method you purchased.
Within one defined zone, collect small subsamples at a consistent depth from representative locations. Remove surface mulch and vegetation so they do not become part of mineral-soil analysis. Combine only the subsamples assigned to that zone in a clean container, taking care that soil from the shovel, bucket, gloves, or another area does not cross the boundary.
Tool material deserves attention when micronutrients are requested. Galvanized, brass, or bronze equipment can introduce metals into a sample, which is why collection guides tell gardeners to use clean, noncontaminating tools. Follow the chosen laboratory's allowed-material instructions and use a clean container that has not held fertilizer or another substance likely to alter the result.
Mix the composite thoroughly so the submitted portion represents all its subsamples. Send the quantity and container the laboratory specifies, not the entire bucket by default. The bag and form should carry the same zone ID as the map, along with the accurate intended planting, collection depth, date, and any information the laboratory requests.
Interpret recommendations within their crop and unit basis
Begin with the report's named sample, crop, and units before acting on a recommendation. Confirm that the zone ID matches the intended bed and that the planting category is correct. A recommendation calculated for a lawn, vegetable area, or ornamental bed should be applied only to the area and use for which it was prepared.
Translate the recommendation carefully. Product labels, report units, and garden dimensions may express amounts on different area bases, and an incorrect conversion can turn a sound recommendation into an excessive application. Ask the laboratory or local Extension office when the report does not show how to convert its rate to the measured bed.
Read low, sufficient, high, or other interpretive terms as parts of the laboratory's method, not universal labels detached from the report. The value gains meaning through the lab's analysis, regional calibration, intended crop, and written recommendation. Comparing raw numbers from different methods without that context can suggest a change that is partly methodological.
Use the report to avoid unnecessary inputs as well as to select needed ones. Repeated fertilizer or compost applications can accumulate nutrients beyond plant requirements and add environmental cost. If the recommendation calls for no addition, that is an actionable result: preserve the record and direct attention to drainage, light, watering, roots, pests, or disease as the observed problem requires.
Investigate a surprising result before changing the bed
A result that conflicts with the garden record deserves a sampling review before a corrective application. Confirm the bag ID, map boundary, depth, crop entry, and recent amendment history first. Then ask whether one unusual location, a dirty container, surface mulch, or soil carried from another zone could have influenced the composite. These checks do not invalidate the laboratory method; they test whether the submitted soil represented the decision area.
Compare the recommendation with the exact conditions it addresses. A high or low fertility indicator cannot explain why one corner remains wet, why a shaded plant is sparse, or why roots stop at a compacted layer. If the chemical result is plausible but the observed problem persists, keep the soil finding and continue the diagnosis with drainage, light, roots, watering, insects, or disease rather than forcing the report to answer a different question.
Contact the laboratory when a value, unit, or recommendation is unclear or when the sample history may have compromised interpretation. Share the report number and the collection notes instead of sending only a screenshot of one value. The laboratory can explain its own method and advise whether clarification, a separate comparison, or a carefully repeated sample is the appropriate next step.
Resampling should correct an identified weakness, not become an immediate reaction to every unexpected number. Redraw a zone when the first boundary mixed different management histories; clean the equipment when carryover is possible; preserve the approved depth and pattern when those were sound. Record the reason for the repeat so the second report can be interpreted as a deliberate check rather than an unexplained replacement.
Build a baseline that can survive the next test
File the report with the zone map, submission form, collection date, depth, laboratory method, and recent amendment history. Record the action taken from the recommendation and the exact area treated. This packet connects a later observation to the sample that informed it and prevents a bag label from becoming an orphaned number.
A repeat test becomes more comparable when the zone boundaries, depth, timing, and collection method remain consistent. Move a boundary only for a deliberate management reason, such as dividing a bed that now receives different crops or amendments. Document the change so the new result is not mistaken for a direct continuation of the old zone.
Look for agreement between the report, the intervention, and what can be observed over time. A changed pH or nutrient status can be followed with comparable laboratory records; drainage, rooting depth, light, and irrigation still require their own observations. When the numbers and garden condition seem to conflict, review the map and method before concluding that the soil changed unexpectedly.
Compare laboratories against the intended decision
Before ordering, list the mapped soil zone, intended crop or planting, question, required analytes, laboratory sampling instructions, report units, recommendation basis, turnaround and total charge. Mark whether each proposed test actually answers the question. Keep specialized screening separate from routine fertility. After sampling, retain the real depth, date and zone boundary with the report so the next result can be compared on the same basis.
Tool notes
- Type
- Home-garden soil testing service
- Purpose
- Select a laboratory scope and collect a representative sample that can support one defined pH, fertility, amendment, comparison, or specialized-screening decision for a mapped home-garden zone, while preserving enough collection context to compare a later report without confusing a changed boundary or depth with soil change.
- Affiliate
- No commercial links
Maintenance
- Before ordering, save the current package description, analyte list, fees, turnaround, sample quantity, preparation rules, and example report. Recheck these details for a later test because laboratory offerings and submission instructions can change.
- Assign a short ID to every management zone and place that ID on the map, sample bag, submission form, report file, and amendment record. Retire an ID when its boundary changes substantially instead of silently reusing it for a different area.
- Clean and dry sampling tools and the mixing container before the first zone and between zones. Inspect joints, corners, and seams for retained soil; a small residue from a fertilizer spill or heavily amended bed can compromise the next composite.
- Store the report with its collection depth, date, method, intended planting, recent amendment history, and map. Add the action actually taken, including the treated zone, so a later comparison reflects management as well as laboratory values.
- Check the report's area and unit basis before measuring any amendment. If the conversion to the garden bed is unclear, obtain help from the laboratory or local Extension office and keep the clarified calculation with the report.
- For a repeat comparison, return to the same mapped zone and use the same approved depth and collection pattern unless the laboratory directs a change. Record altered timing, boundaries, methods, or crop use beside the new result.
- Review the saved baseline before adding fertilizer, lime, sulfur, or compost. Use the current recommendation for the named planting and preserve a no-addition result as a management decision, not as an invitation to apply a routine product anyway.
Plants in this guide
Related reading
Sources
- Soil testing for lawns and gardens. University of Minnesota Extension. Source record · Accessed 2026-08-15.
- How do I test my garden soil?. Oregon State University Extension Service. Source record · Accessed 2026-08-15.
- A Guide to Collecting Soil Samples for Farms and Gardens. Oregon State University Extension Service. Source record · Accessed 2026-08-15.
- Soil Testing. Penn State Extension. Source record · Accessed 2026-08-15.