Grow · mulching
Mulching Around Perennial Crowns
Find every plant crown, measure the mulch already present, redistribute sound material, and add only enough to restore the intended final layer.
Published Last updated
In this guide
- Begin at the plant base, not the bed edge
- Measure the deficit after redistributing sound mulch
- Recover the original soil line carefully
- Count the old layer before buying the new one
- Use the scoped depth, not the largest published number
- Restore the layer with a rake before opening a bag
- Add only the deficit that remains
- Recheck after water settles the bed
- Read the failure pattern before correcting it
- Let later measurements control replenishment
- Steps
Begin at the plant base, not the bed edge
Mulching around perennial crowns begins at every living plant base, before the bed is raked smooth. Trace perennial stems down to the point where they emerge from the soil and identify the crown as the center that must remain open. Pull bark, chips, or other loose organic mulch outward until wet material no longer rests against shoots or the plant base.
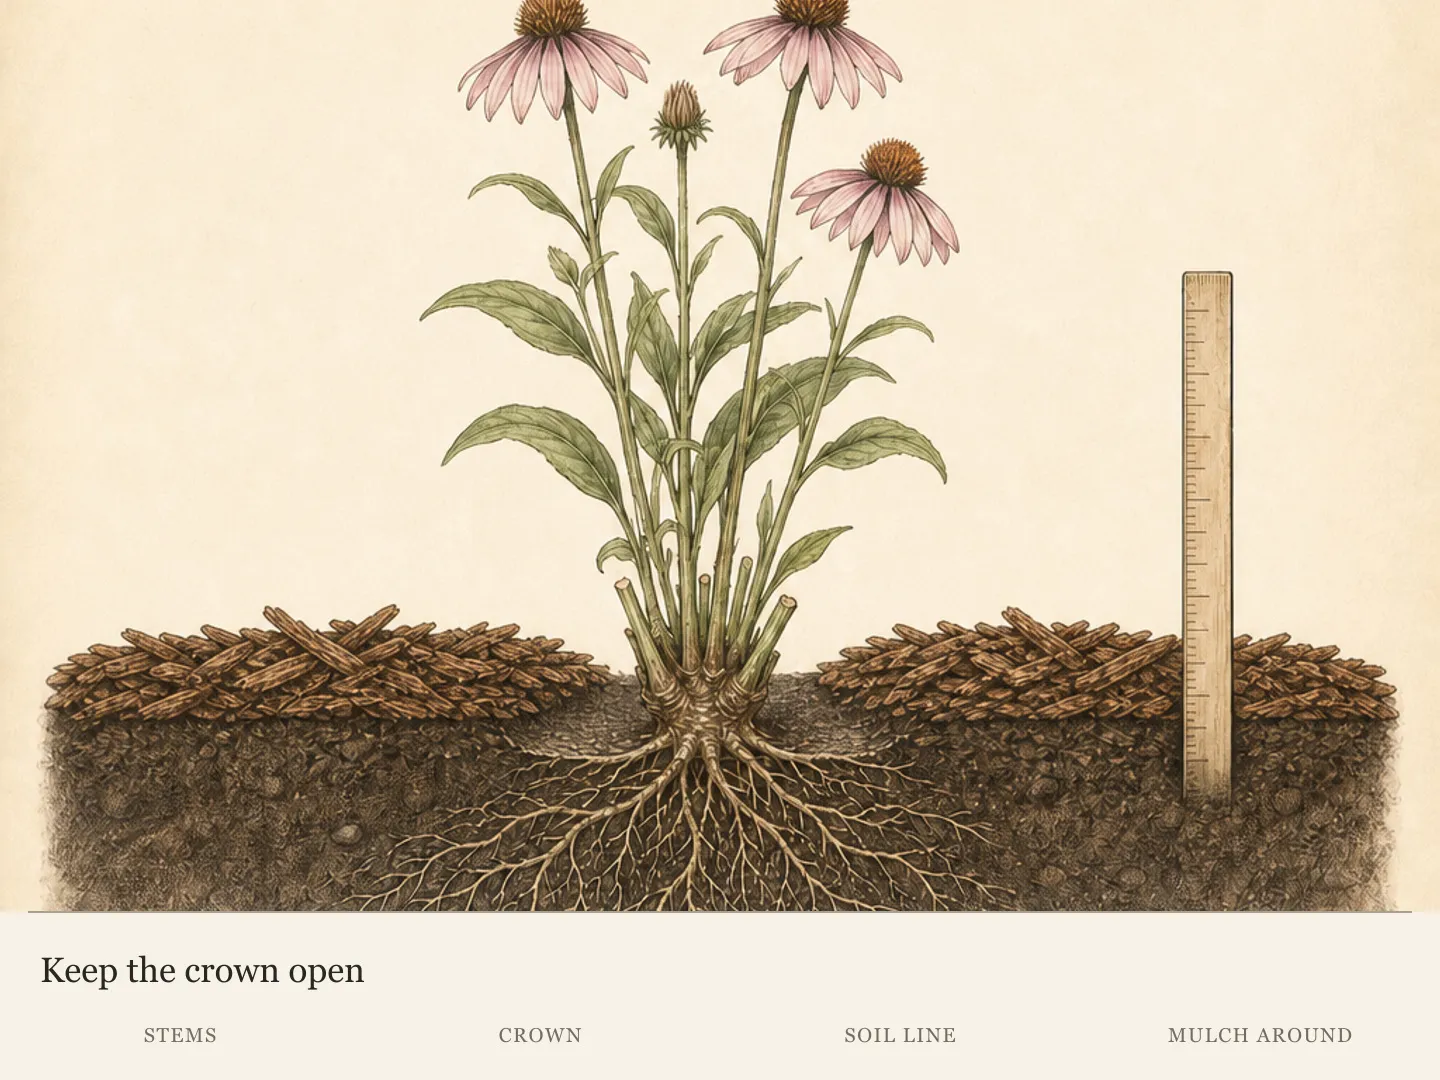
Crown clearance protects the transition between roots and shoots from prolonged contact with moist mulch. The exact shape varies among perennials, so use the visible plant and original soil line as the guide. Keep mulch over nearby soil, where it can moderate moisture and temperature and reduce light reaching weed seedlings, while leaving the crown exposed to air.
Shrubs in a mixed bed need the same base-first attention. Follow stems to the soil and open the immediate collar without scraping bark, digging into mineral soil, or exposing roots. A uniform blanket across the entire bed is a poor visual standard when living bases occupy different heights and forms.
Mark crowns that disappear when viewed from the bed edge, especially dormant or newly emerging plants. Temporary markers preserve those locations while material is loosened and moved. This small preparation step turns accidental burial into something visible during the work, when correction is easier than after the bed has settled.
Measure the deficit after redistributing sound mulch
Expose and mark living crowns, then assess the existing layer before buying more material. Move usable excess into genuine low areas and remove surplus the bed cannot accept. Add only the remaining deficit while keeping bases open. Recheck after settlement because an even loose surface does not prove that the final depth or crown clearance is correct.
Recover the original soil line carefully
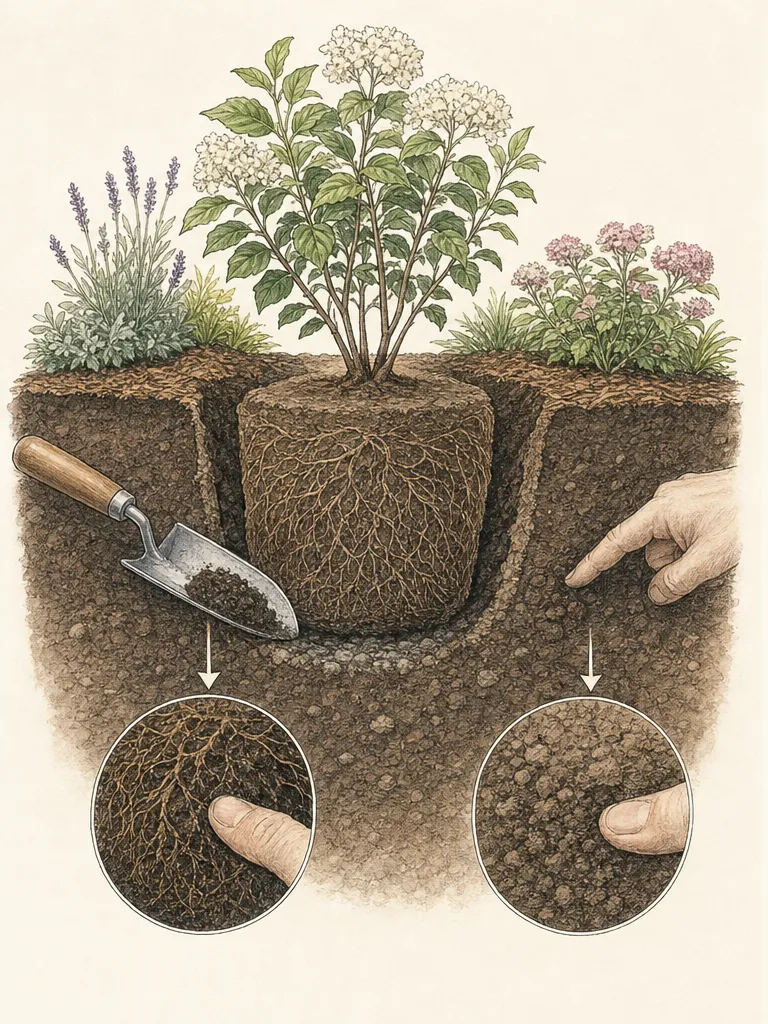
If last year's layer hides a crown, work with fingers or a small hand tool and remove only loose mulch. Stop when the plant's original soil line becomes apparent. A buried label, a change in stem color, or fine roots growing through decomposed material can help reveal history, but none is a reason to excavate blindly around the crown.
Separate accumulated mulch from soil. Organic material may darken and break down until the boundary is less obvious, yet the maintenance task remains surface management. Scraping into mineral soil can injure shallow roots and converts a crown-clearance pass into an unplanned planting-depth correction.
Pause when finding the base would require digging or when the plant itself appears set too deeply. Clear the movable mulch, mark the location, and seek species-specific or local guidance before disturbing the root zone. Mulch correction can remove added cover; it cannot safely diagnose or repair every original planting-depth problem.
Finish this pass with a visible collar at each identified base and no mound leaning inward. The collar need not form a geometric ring. Its practical test is simple: the crown or stem emergence remains visible, nearby soil retains surface cover, and loose material cannot immediately slide back against the plant.
Count the old layer before buying the new one
Push a ruler through the mulch until it reaches mineral soil, then take readings near the front, middle, and back of the bed. Add checks beside mounds, bare patches, path edges, irrigation outlets, and slow-draining areas. The purpose is to map variation, not to produce one average that hides where correction is needed.
Measure the settled layer actually present. A fluffy handful held above the bed exaggerates depth, while a crusted mat may hide usable material beneath its surface. Loosen representative spots before the final reading so the measurement reflects the layer that can remain after maintenance rather than its weathered outer shape.
For a perennial flower bed, about 2 in (5 cm) total is a useful conservative target drawn from Illinois guidance. The word total controls the work: old mulch plus new mulch should finish near the selected depth. It is not a direction to add another 2 inches every spring.
Keep the measurements tied to locations. A deep mound at one crown and bare soil elsewhere cannot be corrected by adding the same amount across the bed. Note the deficit only after sound existing material has been loosened and redistributed, since moving what is already present may eliminate much of the planned purchase.
Use the scoped depth, not the largest published number
Published depth ranges differ because they address different plantings, materials, drainage, and climates. University of Minnesota gives a broader 2–4 in (5–10 cm) range for general garden mulching, while Illinois uses about 2 in for perennial flower beds. Those statements describe separate scopes and should not be averaged or treated as competing targets.
Use the perennial guidance for an ordinary established perennial bed unless a more specific local or species recommendation applies. Stay toward the shallow end where drainage is slow or the material is fine. Coarser material in another landscape setting may have different guidance, but that does not turn the upper end of a broad range into a goal around every crown.
Depth is only useful when placement is correct. Two inches piled against a plant base still fails the crown-clearance test, while a thinner patch over mineral soil may need replenishment after nearby excess is moved. Evaluate total depth and plant-base contact as two separate checkpoints during every pass.
The calendar does not establish a deficit. Organic mulch decomposes and shifts at different rates, so annual top-ups can accumulate into one overly deep layer when old material remains. Measure first each time and let actual loss, displacement, local guidance, and crown condition decide whether any new material is needed.
Restore the layer with a rake before opening a bag
An existing mulch layer has value that color does not measure. Organic material fades and settles as it weathers, yet it may still cover soil effectively. Before calculating a purchase, distinguish cosmetic aging from actual loss of coverage. A gray surface can remain useful; a fresh-looking mound can still be too deep against a crown.
Texture reveals whether the old layer can be restored. Loose weathered pieces can be redistributed, while a coherent crust may need to be opened before its depth is measured honestly. Material that separates into ordinary fragments belongs in the coverage calculation. A sour odor, obvious weed seed or diseased debris is a different signal because moving it would spread a problem through the bed.
The useful inventory is the amount of sound material already on site. Deep pockets beside crowns and thin spans between plants are often two sides of the same uneven layer. Correcting that distribution can solve both conditions and reduce the new volume needed. The purchase deficit should be calculated only after the retained material occupies safe soil surfaces.
Keep plant anatomy as the boundary while evaluating the old layer. A rake can work across open ground, but crowns, emerging shoots and visible shallow roots require hand-scale judgment. The goal is not a uniformly groomed texture at any cost; it is continuous soil cover with deliberate openings around living plant bases.
Classify the existing material as sound, suspect or merely misplaced before adding more. Let the sound portion count toward the final depth and redistribute it where needed. This prevents a faded bed from being buried under an unnecessary second full layer.
Add only the deficit that remains
Open new material only after crowns are marked, old mulch is loosened, and excess has been redistributed. Recheck the thin areas with the ruler. The remaining gap between the settled existing layer and the chosen final depth is the amount to add at that location, not a bed-wide annual rate.
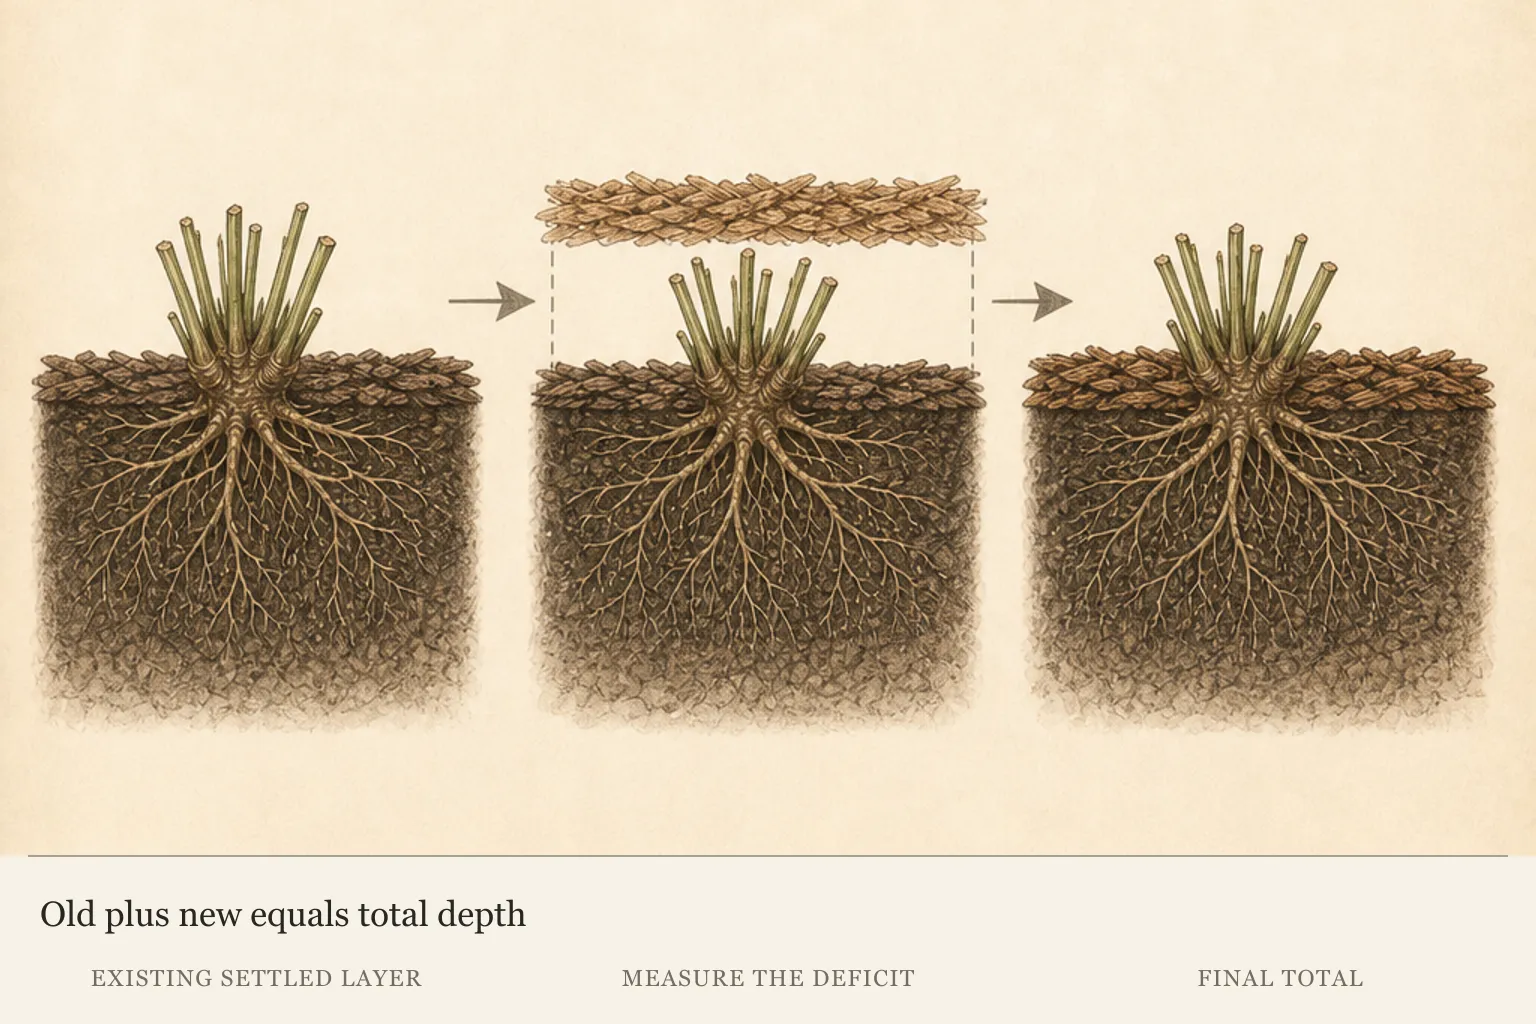
Apply organic mulch in small amounts to open soil and blend it into the retained layer. Work around plant bases from the outside inward, stopping before material touches a crown or stem collar. This sequence keeps the target visible throughout the application and avoids covering every plant before trying to find it again.
Keep woody mulch on the surface. Mixing it into soil changes the operation from surface mulching to soil amendment and can disturb established roots. The present task is to restore cover over mineral soil while preserving living plant bases, measured total depth, and the existing root zone.
Aim for functional continuity, not a ruler-perfect finish. Soil should be covered between plants without mounds, hollows that direct irrigation away from roots, or abrupt piles at bed edges. Pause after each small area and view it from several angles; a hidden crown is easier to spot before the remaining material is spread.
Recheck after water settles the bed
Water normally or wait for rain, then inspect after the layer settles. Organic pieces can shift toward low spots, irrigation paths, and plant bases. Reopen any collar that slumped against a crown and move gathered material back toward a measured thin area rather than adding more to the original bare point.
Take new readings where the first map showed mounds, bare patches, and slow drainage. The finished layer should remain near the chosen total depth after settling, with visible plant bases and continuous cover over surrounding soil. Variation of individual pieces matters less than a persistent deep pocket or exposed runnel.
Observe how water enters the layer. Surface cover should not form a hollow that sends irrigation directly to the bed edge or a compacted mat that sheds water away from the intended soil. Loosen and redistribute the surface when flow reveals either pattern, keeping the crown collars open during correction.
Settling is the first maintenance checkpoint, not a signal for an automatic second application. Add material only where a fresh measurement still shows a true deficit after redistribution. If repeated movement occurs in the same place, address the slope, irrigation pattern, or bed edge that is displacing mulch before repeating the top-up.
Read the failure pattern before correcting it
A buried crown beside an otherwise adequate layer is a placement failure. Pull the material outward, confirm the original soil line, and use the excess to cover a measured thin area. Adding more mulch elsewhere before this correction preserves the mound and makes the bed-wide total harder to judge.
A deep layer across most of the bed points to cumulative additions. Loosen the surface, measure the settled total, and redistribute sound excess to an area that can use it. Where the whole bed remains above the selected perennial depth, remove the surplus rather than hiding it beneath another fresh-looking layer.
A thin strip that returns after every rain indicates movement, not necessarily decomposition. Observe the slope, irrigation flow, path edge, and places where material gathers. Correct the source or redistribute after settling; repeated filling of the same runnel can build an unseen mound at its destination.
A matted surface with adequate depth calls for loosening and a water-entry check. A faded but loose layer may need no action beyond crown clearance. These different appearances lead to different work, so color, calendar, and a single reading should never replace the combined checks of total depth, crown contact, material condition, and bed pattern.
Let later measurements control replenishment
Record the approximate settled depth, month, material condition, and areas that needed redistribution. Mark any crown that was difficult to locate. These notes shorten the next visit and reveal whether loss comes from decomposition across the bed or movement toward the same low and sheltered spots.
Return with the ruler before bringing new mulch. Reopen plant collars first, loosen sound mats, and measure the total that remains. Replenishment then answers a documented loss, while an adequate layer can be left in place even if its color no longer matches fresh material.
Watch plant bases as shoots emerge and canopies expand. Mulch moved by rain, animals, weeding, or routine bed work can close a collar between scheduled applications. Pull it back when found and use the exposed base as the checkpoint; no new material is required merely because maintenance disturbed the surface.
A stable bed shows visible crowns, measured cover over soil, and fewer corrections after each settling event. When a location repeatedly becomes deep or bare, treat that pattern as a placement problem. Move sound material, adjust the source of displacement, and preserve the final total instead of restarting with another uniform layer.
Steps
- Level
- easy
- Time
- About 30–60 minutes for a small established bed
- Tools
- Ruler, Hand rake, Small hand tool, Temporary plant markers
- Materials
- Organic mulch only if the measured layer is thin
- 1Mark every crown and stem base
Trace living stems to the original soil line and place a temporary marker beside dormant or hard-to-see crowns. Pull loose mulch outward until the crown and immediate stem collar are visible and no wet material rests against them. Work with fingers or a small hand tool near the base, and stop if finding it would require digging into mineral soil or disturbing roots. Leave each marker in place through settling.
- 2Remove weeds and suspect debris
Lift accessible weeds and loose leaves before moving mulch. Separate material mixed with obvious weed seed, diseased plant debris, or an unusual sour odor so it is not spread through the bed. Retain ordinary faded or partly decomposed organic mulch when it is sound enough to loosen and continue covering soil. Keep suspect material apart from the sound pile throughout redistribution.
- 3Measure and loosen the existing layer
Insert a ruler to mineral soil at representative front, middle, and back points, plus mounds, bare spots, path edges, and slow-draining pockets. Record each existing total by location. Break matted surfaces lightly with fingers or a rake while avoiding crowns and shallow shoots, then remeasure the loosened layer before calculating any deficit. Use the second map for redistribution.
- 4Redistribute before adding
Move sound excess from deep spots and plant bases into measured thin areas between plants. Feather the edges, maintain an open collar at every marker, and keep mulch on the surface. Recheck both depth and crown contact after redistribution; this step may remove the need for new material in much of the bed. Set aside any surplus that has no suitable thin area.
- 5Remove surplus that the bed cannot use
Compare the redistributed layer with the chosen total depth. If sound material remains after every suitable thin area is covered, take that surplus out of the bed so it cannot become a new mound at the edge or around another crown. Keep suspect debris separate, and preserve the final measurement as the limit for this maintenance pass.
- 6Add the remaining deficit
Apply small amounts only where the loosened and redistributed layer remains below the chosen local depth. For an ordinary perennial flower bed, use about 2 in (5 cm) total as a conservative default, not as an annual addition. Blend new and retained mulch while keeping crowns and stem collars visible. Pause after each area to check for mounds and exposed runnels.
- 7Inspect the first settled layer
After ordinary watering or rain, reopen any crown collar that slumped and remeasure mounds, bare points, and slow-draining areas. Redistribute gathered material before adding anything. Correct hollows that direct water toward the bed edge and lightly loosen a surface that sheds water instead of allowing it through. Repeat the depth reading only after these corrections settle.
- 8Record the maintenance baseline
Write down the approximate settled depth, month, material condition, and locations that shifted. At the next visit, mark bases, loosen sound material, redistribute excess, and measure again before buying mulch. Additions should answer observed decomposition or displacement, while an adequate existing layer remains in place. Compare repeated deep or bare spots with the earlier map before changing the amount.
Plants in this guide
Related reading
Sources
- Planting and Care. University of Illinois Extension. Source record · Accessed 2026-08-15.
- Mulching for soil and garden health. University of Minnesota Extension. Source record · Accessed 2026-08-15.
- Mulching Landscape Trees. Penn State Extension. Source record · Accessed 2026-08-15.