Grow · heat wave watering
Heat-Wave Watering for In-Ground Hydrangeas
Use repeatable root-zone checks before, during, and after extreme heat so an in-ground hydrangea receives slow, verified water only when the soil needs it.
Published Last updated
In this guide
Let the forecast trigger a soil check
Water an in-ground hydrangea through a heat wave by checking its occupied root zone before temperatures peak, then applying water slowly only where that soil is dry enough to need it. Verify penetration below the surface and let the next root-zone check determine the next application. The forecast starts observation; it does not impose an automatic watering schedule.
Hot, windy conditions can pull water from hydrangea foliage faster than the plant replaces it. Wilt may remain temporary, or exposed tissue may progress to brown crisp edges when the imbalance persists. Watering addresses the supply side only when dry soil is part of the evidence. Mulch and temporary shade address evaporation and acute exposure, so the event plan can respond to more than one side of the imbalance.
Choose three inspection points under the canopy and mark them on a sketch or with small labels. Include the hottest exposed side, a sheltered side and a point near the outer root area. Record soil feel and probe depth before the event. These locations form a baseline for every later decision.
Pre-event hydration is preventive only when the root zone can use water. A dry inspection before forecast extreme heat supports acting before demand peaks. A moist profile supports leaving it alone and preparing mulch or temporary shade instead. This conditional use of the forecast protects the shrub from entering heat already dry without saturating soil that has adequate moisture.
Returning to the same points reveals whether one side dries sooner, whether the previous application reached useful depth and when moisture begins to recede. Moving the probe to whichever patch looks driest produces unrelated snapshots. Surface dust, dark mulch or a single drooping leaf cannot replace a repeatable below-surface comparison.
Check the plant at the same time as the soil. Mark a shoot that tends to wilt, photograph it late in the day and return the next morning. Record the exposed-side foliage separately from sheltered foliage. The plant and soil records should be read together because heat load can rise while the root zone remains moist.
Separate afternoon droop from a dry root zone
Inspect the marked soil points and compare afternoon posture with the next morning before changing irrigation. Dry occupied soil calls for slow water followed by a penetration check. Soil that remains moist calls for observation and exposure assessment. Track new injury; old brown edges do not become green again merely because the water decision was corrected.
Separate young and established root zones
For a recently planted hydrangea, check the original root ball and surrounding backfill separately. Roots remain concentrated near the planting area, and the nursery mix can dry at a different rate from native soil. A moist backfill reading cannot establish that the root ball is moist, and the reverse is also true.
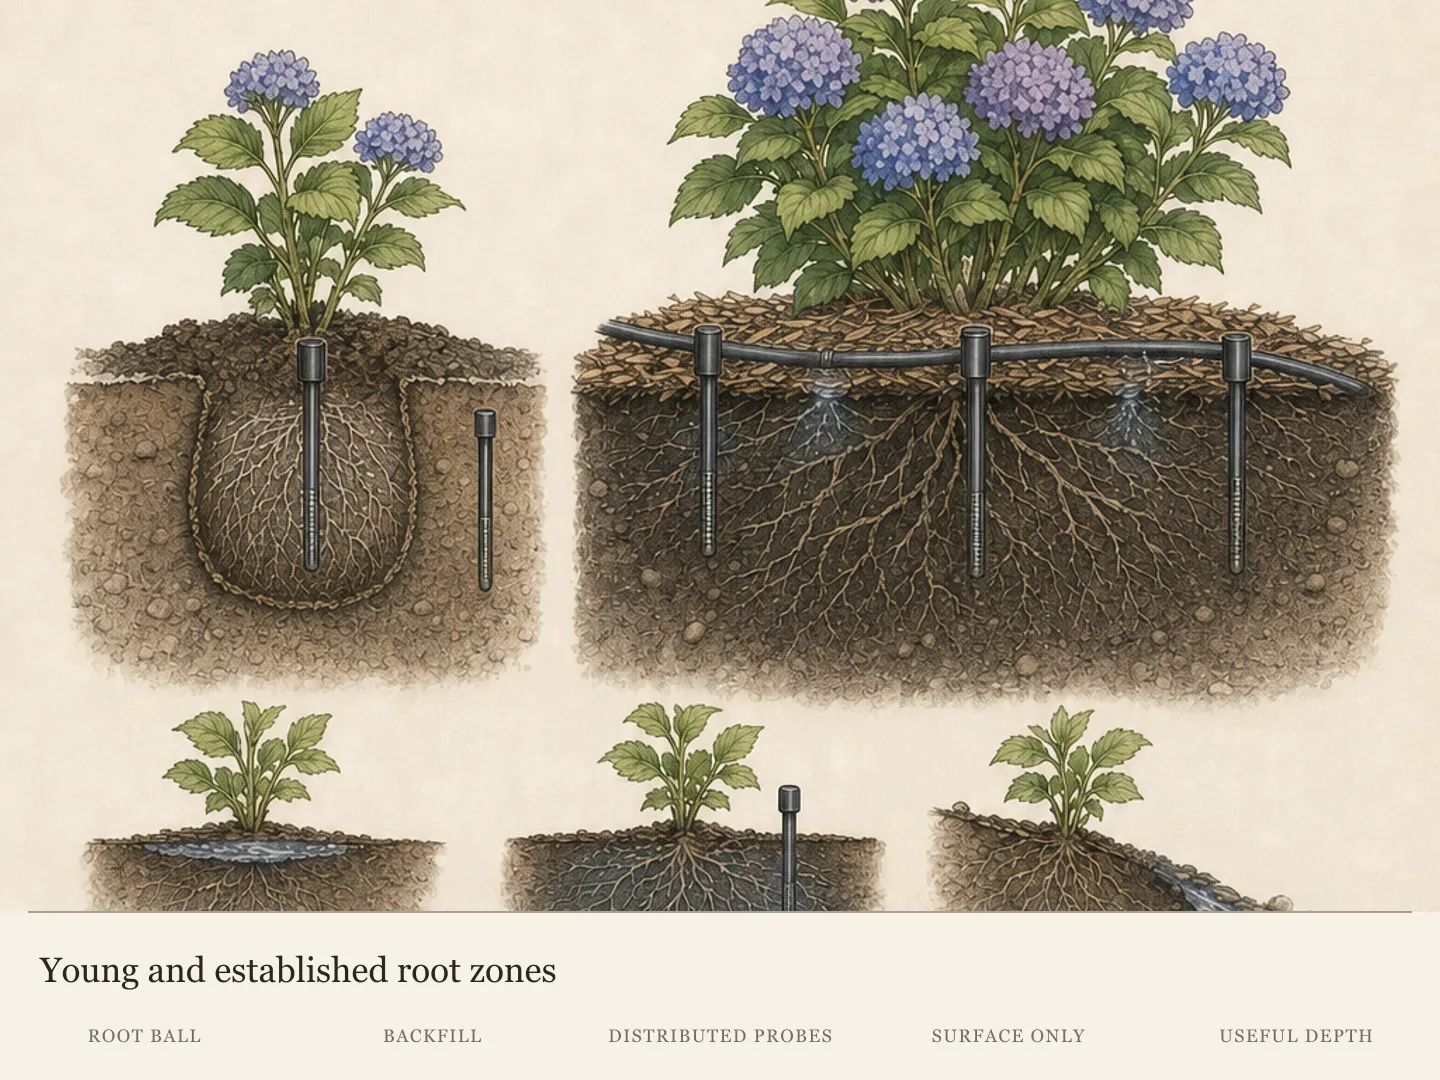
Place needed water where roots currently occupy the soil while expanding the checked area as the shrub establishes. Compare the same root-ball and backfill points after each application. This catches a common failure path in which water travels through one material while the other remains dry or stays much wetter.
Establishment has no single nationwide date at which the root-ball check becomes irrelevant. Let the moisture pattern and expanding plant response guide the transition. As checks farther from the original ball begin to describe the active supply area, widen delivery and monitoring together. Dropping the inner check too early can miss a concentrated dry zone; keeping all water there too long can neglect expanding roots.
For an established shrub, inspect across the broader root zone and distribute needed water over that area. University of Minnesota guidance uses dryness in the upper six to nine inches as the watering cue for established woody plants. Test at more than one point because a single wet pocket can conceal a dry exposed side.
Soil texture, slope, wind and reflected heat change how quickly the useful layer dries and how water enters it. Hydrangea species and sites also differ in heat, sun and dry-soil tolerance. These differences are why no universal temperature, runtime, volume or weekly interval can replace the local probe record.
Read below the mulch
Pull mulch aside at every marked point and use a trowel or narrow probe to inspect below it. Cool moist soil means the forecast has not yet created a deficit at that location. Dry soil through the relevant root area supports watering. Record both the feel and the depth at which the condition changes.
Mulch can remain dry on top while conserving moisture beneath it, and recently wetted mulch can hide dry soil below. Reading the organic layer as if it were the root zone reverses both possibilities. Move it aside cleanly, inspect the mineral soil and restore the layer only after the check or watering work is complete.
Probe gently and stop around buried irrigation, lighting cable or dense roots. If the tool will not enter hard soil, open a small test hole with a hand trowel without forcing it. Note whether the restriction is compaction, stone or a dry crust because each changes where delivery can reach the soil.
Resistance is information, but it is not automatically dryness. Stone, dense roots and compacted soil can all stop a probe. Use the small trowel opening to see what the tool encountered and record the limitation. Forcing the probe risks damage and still leaves the moisture question unanswered. Shift only enough to obtain a safe, comparable reading near the intended point.
Use the same method at the follow-up check. A deeper hole one day and a shallow surface touch the next cannot show whether moisture changed. The log does not need to be elaborate: location, soil condition, observed depth, plant posture and the action taken are enough to connect one inspection with the next.
Deliver slowly, then verify
A hose runtime measures the plumbing, not the root zone. Flow rate, slope, soil texture and antecedent dryness decide how much of the delivered water remains where hydrangea roots can use it. Two beds receiving ten minutes from the same outlet can finish with very different wetting patterns, so duration cannot stand alone as the success measure.
Dry soil may initially resist water. On a slope it can send flow downslope; on a crusted or heavy surface it can pond above soil that remains comparatively dry below. Slower input gives infiltration a chance to catch up. When water continues to move away, increasing duration at the same rate merely enlarges the loss.
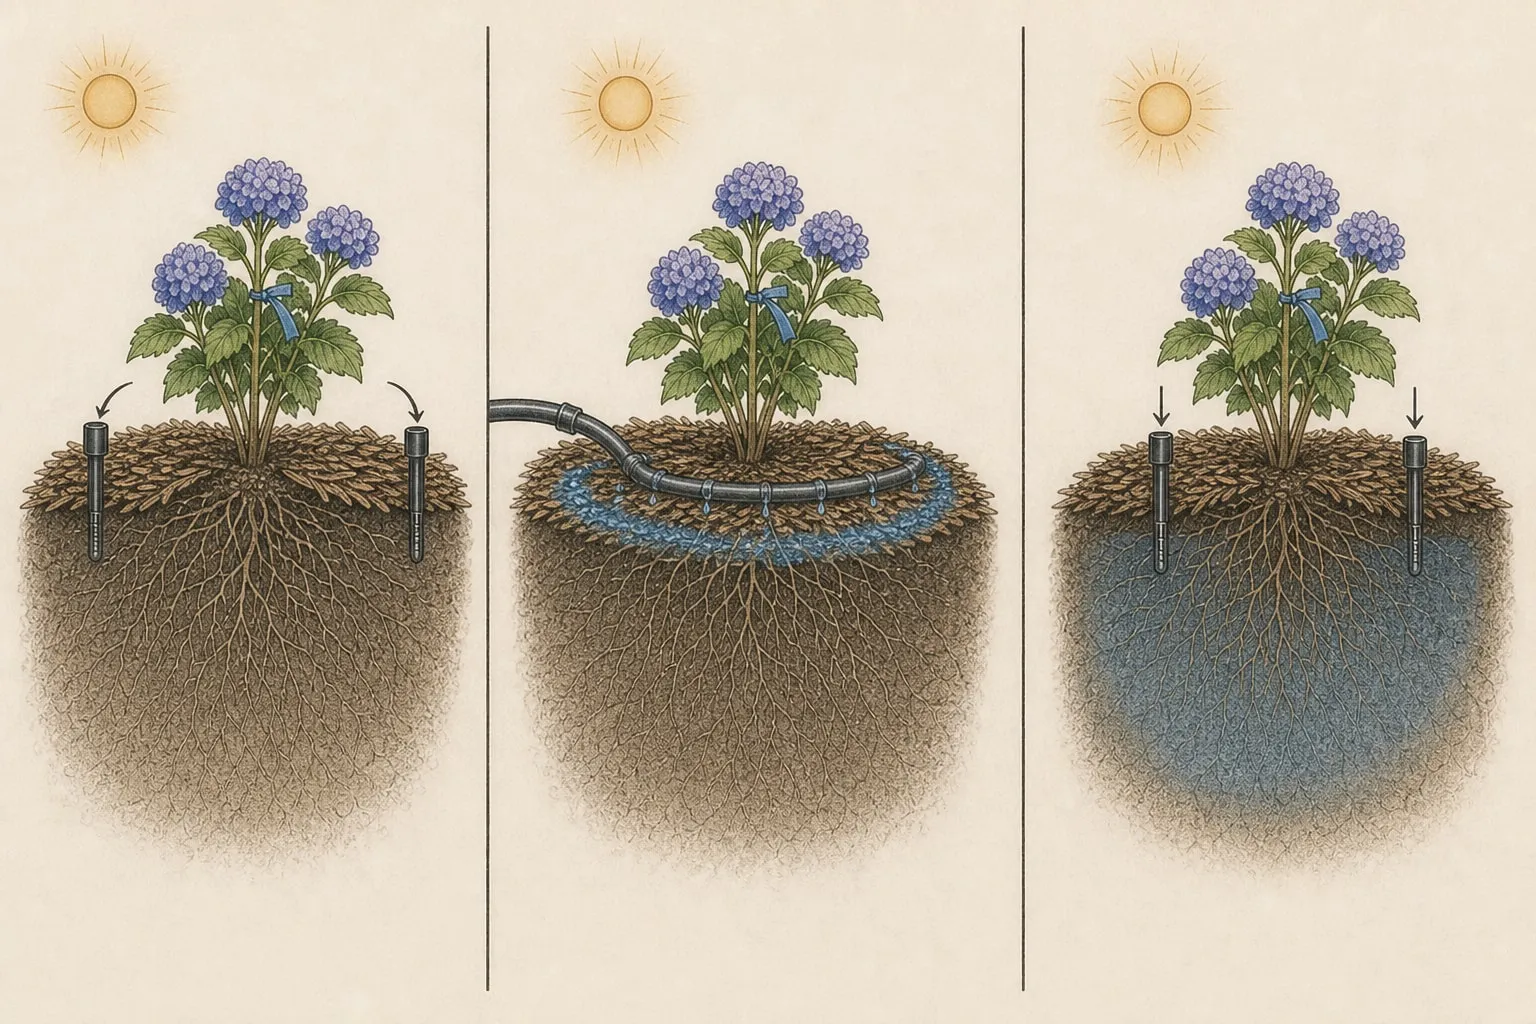
Root distribution makes placement as important as rate. Mature hydrangea roots occupy an area beyond the crown, and a single wet spot at the stem base does not represent the whole plant. Soil-level delivery should create a useful pattern across that occupied area while avoiding erosion and unnecessary wetting of foliage under heat stress.
The mulch surface is an unreliable witness because it darkens quickly and can hide dry soil beneath it. Below-surface checks convert an assumption into evidence. They can show shallow penetration, one-sided coverage or adequate movement through the intended zone, each of which leads to a different next decision.
Verification also creates a local baseline. Once a method and placement have produced a known pattern, compare later soil checks with it. That history is more transferable than a fixed runtime because it records what happened in this bed under these conditions. Judge every watering trial by retained soil moisture, not by the amount of water emitted.
Use wilt as a time comparison
Hydrangeas can droop during the hottest part of the day even when soil remains moist, then stand upright overnight. Photograph one marked shoot late in the day and again early the next morning. Recovery supports temporary heat wilt. It still identifies a demanding exposure, but it does not prove that the roots need another application.
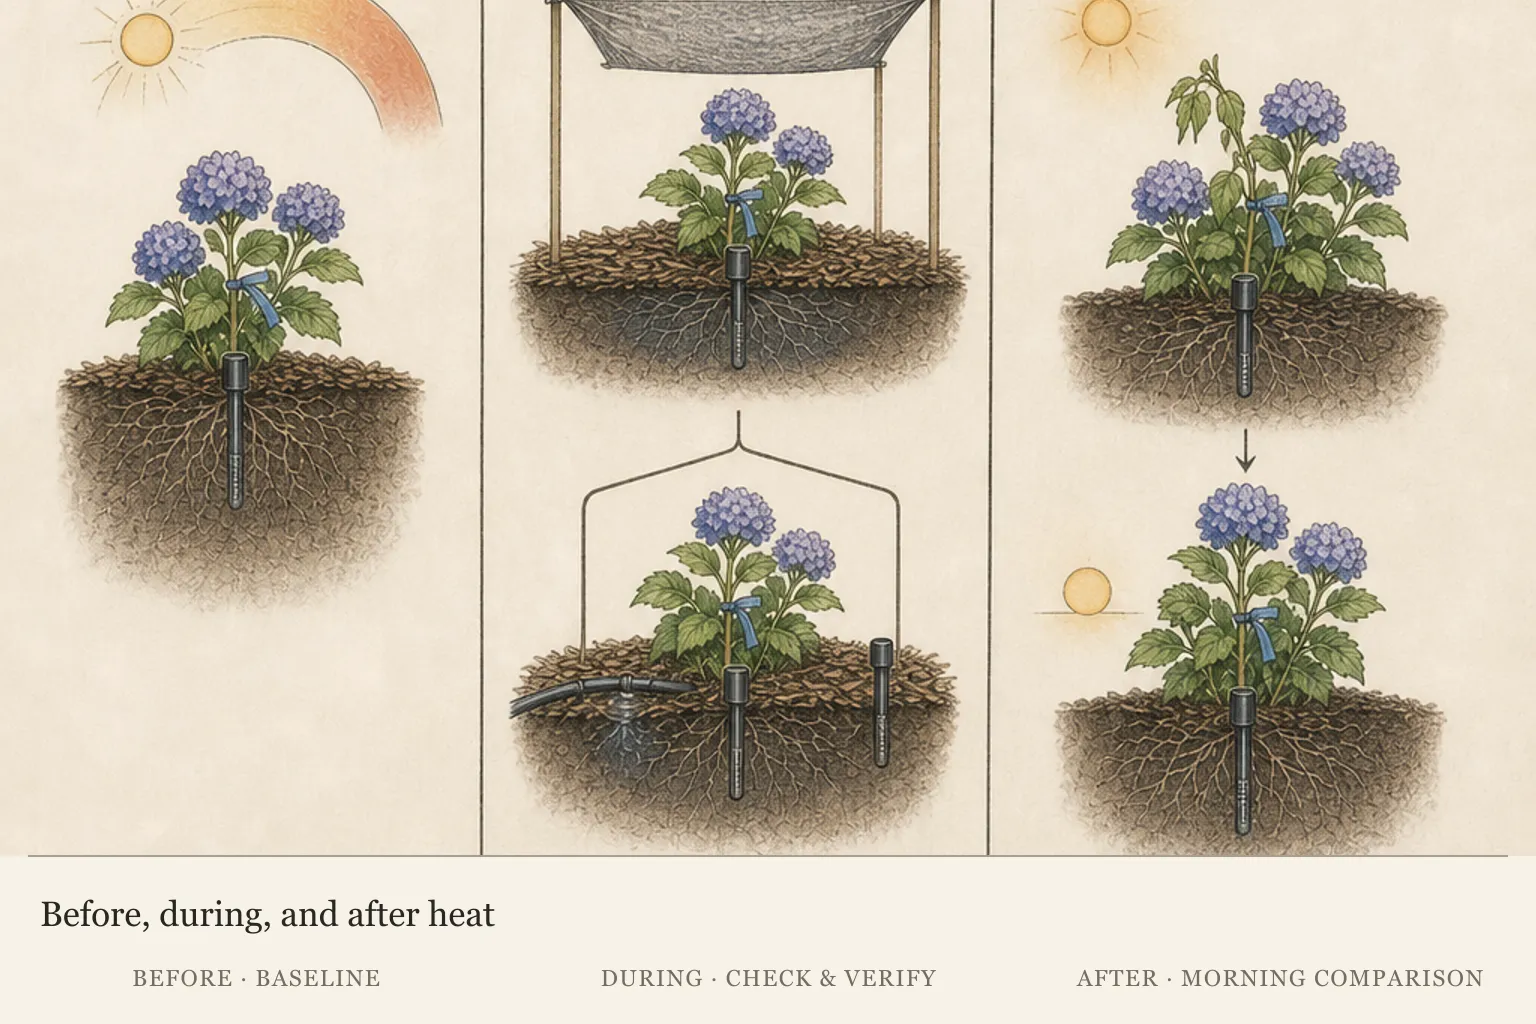
Persistent morning wilt warrants a fresh root-zone check and a broader look at the plant. Dry soil can support prompt watering. Moist soil shifts attention toward heat load, drainage, roots or another problem. Repeating water without that distinction can compound poor aeration while leaving the above-ground stress unchanged.
Four combinations keep the interpretation clear. Late-day wilt over dry soil supports watering. Late-day wilt over moist soil supports watching heat load. Morning recovery shows that posture was reversible. Morning persistence requires a broader inspection after the soil is checked again. None of those observations alone predicts a universal interval for the next application.
When the root zone is genuinely dry and the shrub is wilting, supply needed water when the work can be done safely and without excessive loss or runoff. An ideal clock time is less important than confirmed need and safe delivery. Follow local heat alerts and water restrictions while keeping the method slow and verifiable.
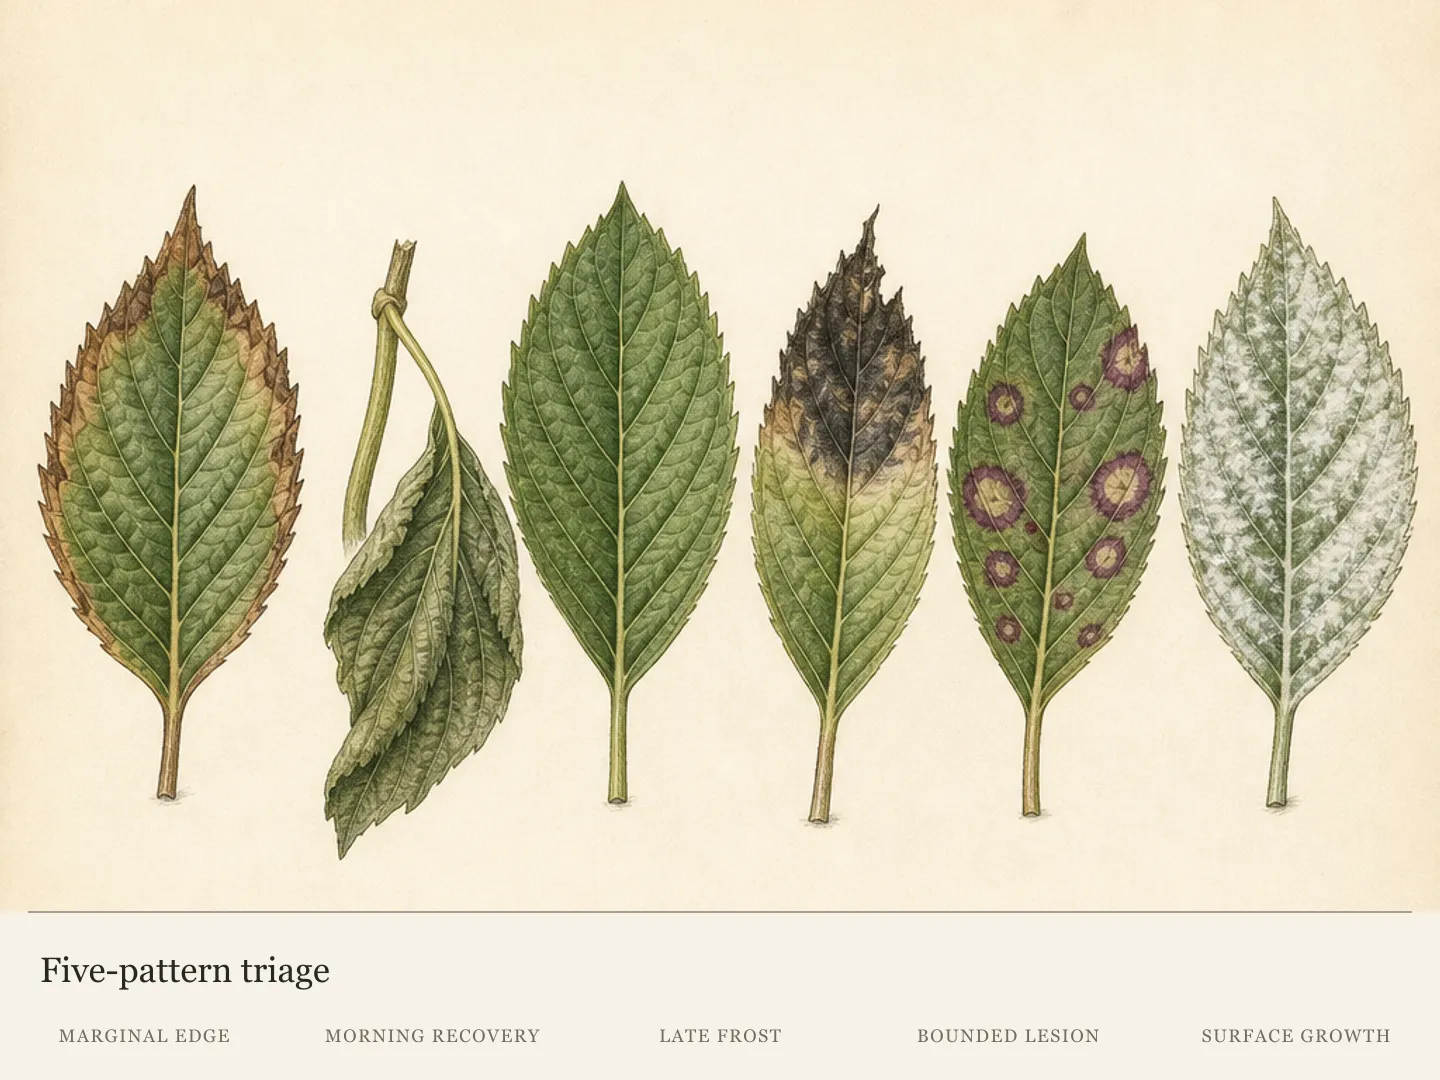
Brown crisp leaf edges are a different checkpoint from posture. Burned tissue will not become green again even if the plant stabilizes. Judge the response through next-morning turgor, moisture retained at the marked points and the pace of new damage. Old scorch is a record of past stress, not a live moisture meter.
Reduce heat load without hiding the soil
Restore an appropriate organic mulch layer after inspection while keeping the crown and stems visible. Mulch slows evaporation and moderates root-zone conditions. A mound against living tissue can hold excess moisture there or interfere with clear inspection, so preserve an open boundary around the shrub's base.
Keep the marked probe points accessible. Burying every marker or adding material without checking the layer makes the next soil reading harder to reproduce. Existing sound mulch can be redistributed; additional material is useful only when the layer actually needs correction. The objective is moisture conservation with a readable crown and soil surface.
For an exceptional event, suspend shade cloth or light fabric on a stable frame above the shrub with open sides for air movement. Concentrate the protection on intense afternoon exposure. Temporary shade reduces acute solar load; it does not correct a dry root zone and should not be used to hide declining foliage from observation.
Keep cloth elevated and ventilated because contact can abrade foliage, conceal wilt and interfere with air movement. Secure the support away from walkways and irrigation lines, then remove the assembly when the event passes. This is short-term heat relief, not a substitute for choosing a site suited to the hydrangea's long-term light tolerance.
Recheck after the peak passes
Return to the same morning photograph, marked shoot and soil points after the hottest period. Note whether wilt still appears, whether moist depth has changed and whether runoff left one part of the root area drier. Compare the results with the baseline; one damaged leaf cannot describe the shrub's current response.
A successful event response does not require old brown margins to recover. Look for stable live foliage, morning recovery and a slowing pace of new injury while the root zone moves through a readable wet-to-dry cycle. If soil stays wet, stop adding water and keep observing; the forecast alone no longer supplies a reason to irrigate.
End the heat-wave protocol when ordinary checks, not the expired forecast, explain the next decision. Remove temporary shade, keep the probe-point map and return to plant- and soil-led care. The event log remains useful because it shows which exposure dried first, how delivery moved through this soil and what the same marked shoot did overnight.
Delay hard pruning and fertilizer while the shrub remains heat-stressed. Burned foliage does not call for a structural cut, and fertilizer does not repair heat injury. Remove only detached material or an immediate hazard while live tissue and later growth reveal the plant's condition.
If damage advances while moisture is adequate, close the automatic watering route. Use the separate leaf-scorch diagnosis and local Extension help to examine exposure, roots, drainage and disease. Bring the moisture log, paired shoot photographs and whole-plant pattern so the next recommendation can explain why verified watering did not stop the decline.
Steps
- Level
- moderate
- Time
- 20 to 40 minutes to inspect and set delivery; watering time varies by soil and flow
- Tools
- Hand trowel or narrow soil probe, Soaker hose or adjustable low-flow water source, Timer or watch, Phone or notebook for repeat observations
- Materials
- Water permitted under local restrictions, Organic mulch, if the existing layer needs correction, Optional shade cloth and stable support frame
- 1Read the forecast and classify the shrub
Note the expected heat period, local restrictions and whether the hydrangea is newly planted or established. Identify the hottest exposure and choose a marked shoot for late-day and next-morning photographs. The forecast begins an inspection cycle; it does not by itself establish that soil is dry or that water should be applied.
- 2Mark repeatable moisture points
Choose exposed, sheltered and outer-root positions and mark them on a simple sketch. For a young shrub, add separate checks in the original root ball and surrounding backfill. For an established shrub, distribute points across the broader root area. Record soil feel and observed moisture depth at every location before the heat peaks.
- 3Inspect below the surface
Move mulch aside and use a trowel or narrow probe at each marked point. Stop around roots, irrigation and buried utilities. Compare the locations and distinguish a dry surface from dryness through the occupied root zone. When the useful soil is already cool and moist, restore the mulch and leave watering for a later check.
- 4Apply water slowly across the root area
When the checks show need, place a soaker hose, low-flow outlet or gentle stream at soil level across the occupied root area. Watch the application boundary. Pause when water ponds or runs downslope, allow it to infiltrate and resume only while the target soil can accept more without water leaving the root zone.
- 5Verify penetration
After a pause, reopen at least two marked test points and check how far moisture traveled. Reposition or extend delivery when the application darkened only the surface or wet one side. Record the method and result. Verification below the surface completes this watering decision; hose runtime and wet mulch do not.
- 6Compare afternoon and morning
Photograph the same marked shoot during late-day wilt and the next morning from the same angle. Pair recovery or persistence with a fresh check at the original soil points. A recovered shoot over moist soil supports observation, while persistent wilt over dry soil supports another evidence-based watering decision.
- 7Close the event with the same baseline
Restore crown-safe mulch, remove temporary shade after the heat and revisit the marked points until the plant and soil settle into a readable pattern. Compare new injury, morning posture and retained moisture with the baseline. Defer pruning and fertilizer while stress remains active, and switch to the leaf-scorch diagnostic if damage advances despite adequate moisture.
Plants in this guide
Related reading

Sources
- How to Help Hydrangeas Weather a Heat Wave. Oregon State University Extension Service. Source record · Accessed 2026-08-15.
- Heat Wave in the Garden: How to Identify and Prevent Heat Stress in Plants. Oregon State University Extension Service. Source record · Accessed 2026-08-15.
- Watering Established Trees and Shrubs. University of Minnesota Extension. Source record · Accessed 2026-08-15.
- Watering Newly Planted Trees and Shrubs. University of Minnesota Extension. Source record · Accessed 2026-08-15.
- Hydrangea: Identify and Manage Problems. University of Maryland Extension. Source record · Accessed 2026-08-15.