Grow · repotting
Repotting Rootbound Rosemary at Its Original Depth
Repot rootbound rosemary only after inspection confirms crowding, using a modestly larger draining container that preserves its original planting depth.
Published Last updated
In this guide
- Treat surface clues as permission to inspect
- Inspect roots before deciding that a larger pot will help
- Choose the timing after the diagnosis
- Give healthy roots a modest ring of new mix
- Prepare the mix and planting height before exposing roots
- Redirect the root mat with restrained handling
- Preserve the old soil line while filling the sides
- Use the first watering as a drainage and stability test
- Replace the old watering assumptions with a new baseline
- Steps
Treat surface clues as permission to inspect
Roots emerging from drainage holes, roots visible at the surface, unexpectedly fast drying, stalled growth, or wilt can justify inspecting a container rosemary. None proves crowding alone. A drainage-hole root may have found an opening while much of the interior mix remains available, and a pot can dry rapidly because of exposure or container behavior. Use the clues to decide whether to remove the root ball, not which new pot to buy.
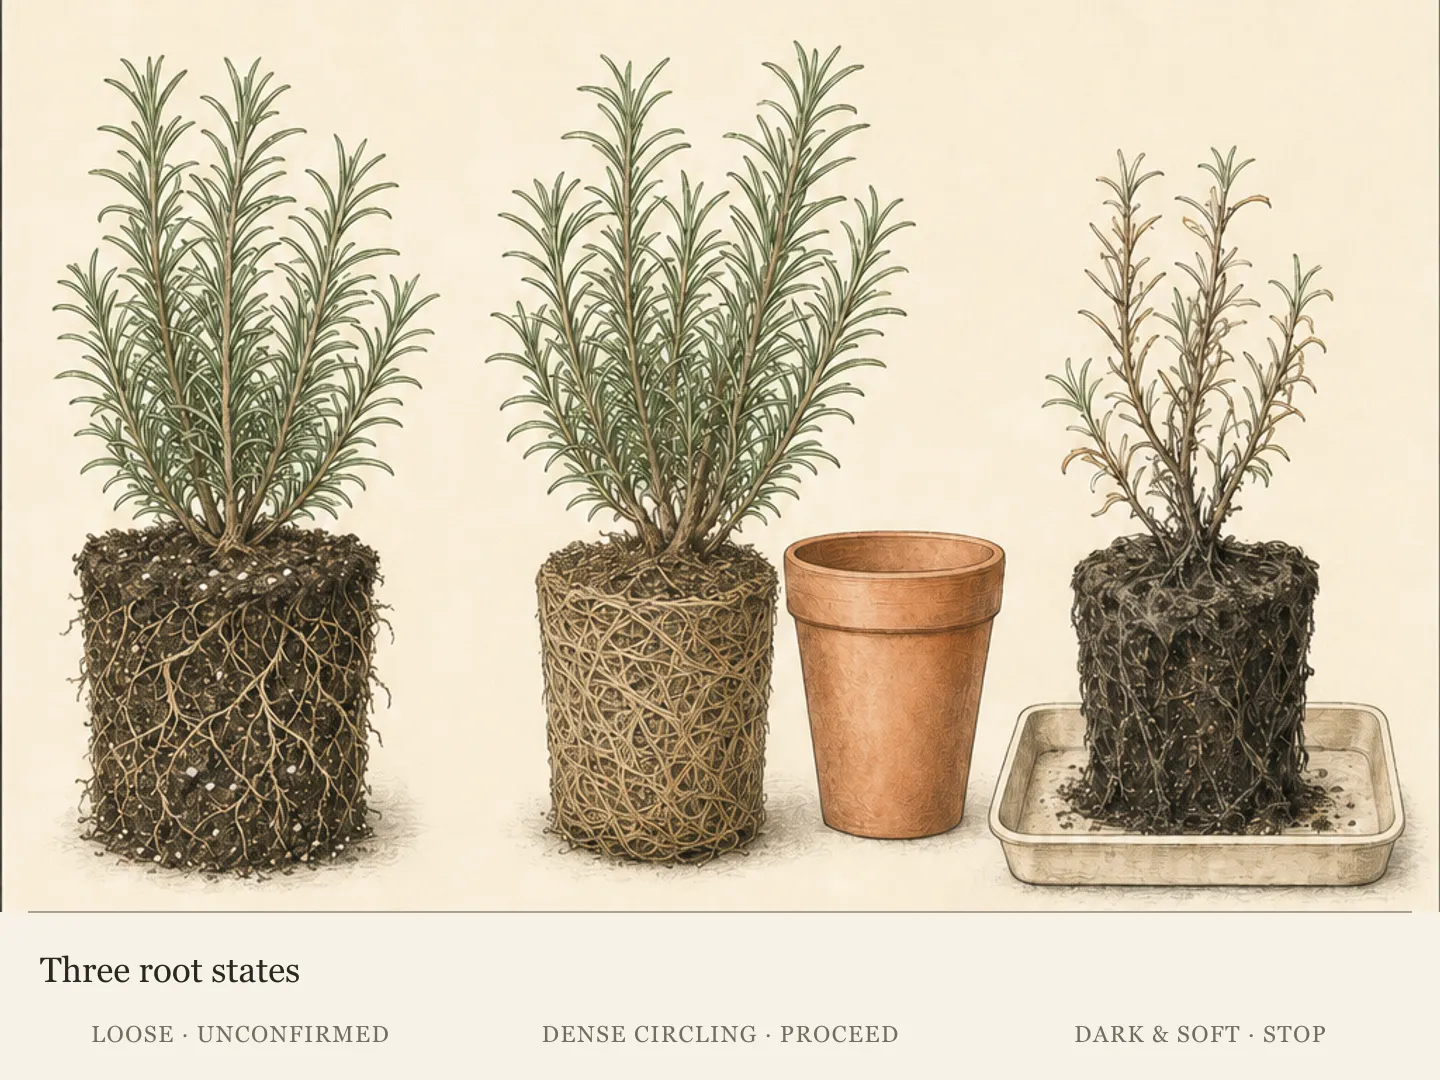
Plan the inspection so the plant can return to its current container if the diagnosis fails. Clear a supported work surface, loosen the pot without pulling the stems, and hold the root ball as it slides free. The woody canopy is not a handle. If the plant resists, work around the container and continue supporting the mass until the pot releases without transferring its weight to the branches.
A rootbound ball shows dense roots circling the perimeter or filling the lower mass so thoroughly that little potting mix remains visible. Look around the sides and base, not only at the first root near a hole. Firm, crowded roots support the routine repotting path. A loose root system surrounded by visible mix does not need extra volume merely because the foliage has slowed or wilted.
The inspection can reject routine repotting in a second way. Dark, mushy, foul-smelling, or extensively damaged roots are not healthy crowding and require a different diagnosis. Replacing their pot with a larger wet volume does not answer the observed problem. Pause, protect the exposed root ball from rough handling, and seek an appropriate diagnosis before cutting roots or resuming the standard sequence.
Inspect roots before deciding that a larger pot will help
Use surface roots, drying or wilt as inspection cues, then distinguish actual crowding from a loose root ball or abnormal damaged tissue. A healthy crowded plant can move into a modestly larger draining pot at its original soil line. After watering and draining, record the new baseline; persistent saturation or instability requires reassessment before further irrigation.
Choose the timing after the diagnosis
When the choice is flexible, align repotting with active growth. The plant can then enter its new container during a period when growth is already underway, and the gardener can read the response against an active baseline. A root showing at a hole is not by itself an emergency that requires immediate work in poor conditions.
Urgent container failure can outweigh ideal timing. A pot that no longer functions as a draining, stable home may require action once healthy crowding has been confirmed. Keep the scope narrow: correct the container and root congestion without adding major root pruning, a dramatic volume increase, or unrelated canopy work to the same session.
Use the inspection to distinguish urgency from convenience. A firm root ball that is crowded yet still stable and draining can wait for the practical active-growth window. A loose, uncrowded ball returns to the old pot while watering, drainage, heat, and exposure are reconsidered. Abnormal roots stop the routine entirely. Those three outcomes prevent every visible root from triggering the same operation.
Give healthy roots a modest ring of new mix
Select a stable container only slightly larger than the confirmed root ball. The useful comparison is between the root mass and the pot's usable interior, not between two decorative outside profiles. Set the old root ball inside or beside the candidate pot and look for a modest, fillable gap around it. The new roots need fresh mix; they do not need a broad collar of empty volume.
An oversized container changes the water problem as well as the space problem. A large amount of mix beyond the occupied roots can remain wet longer than rosemary can use it, while this herb requires well-drained conditions and can decline when roots stay wet. Moving up modestly preserves a closer relationship between root volume, mix, and the gardener's moisture checks.
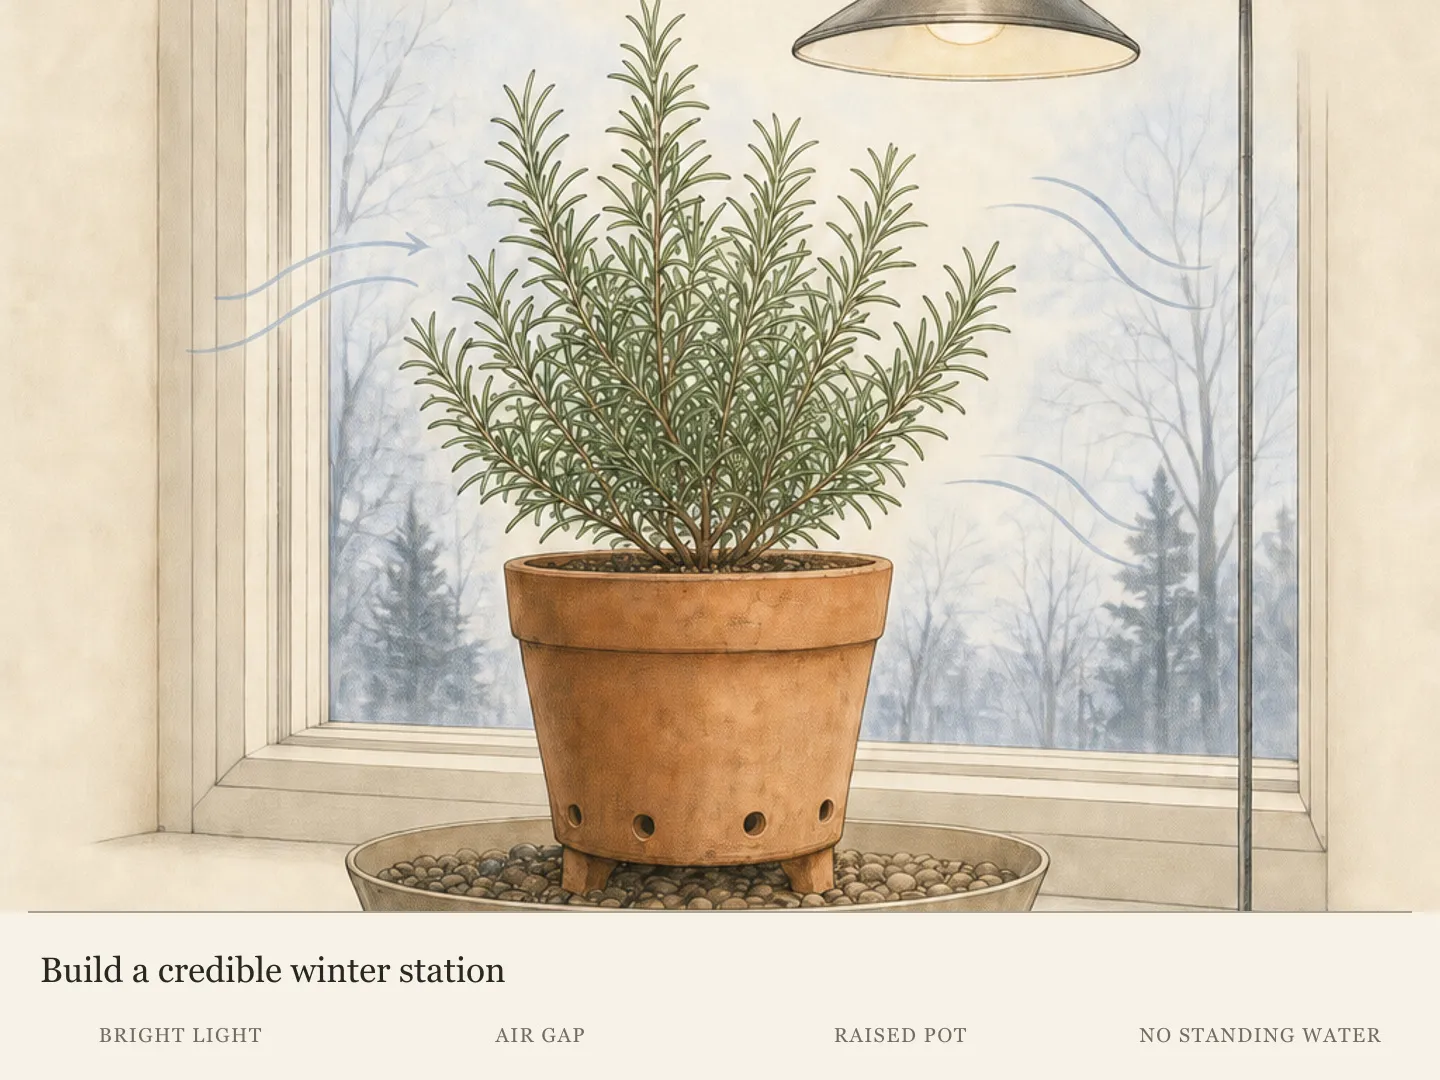
Require unobstructed drainage holes at the lowest point. A hole hidden against a solid cachepot base is not a complete drainage route, and a saucer that is never emptied turns free drainage into standing water after irrigation. Before planting, trace where water will leave the inner pot, where it will collect, and how you will remove it without disturbing the rosemary.
Reject a container that is unstable under the established canopy. The plant and root ball should sit securely while still leaving usable headspace below the rim. Stability does not justify a much larger wet volume; choose a form whose base and proportions support the plant within the slightly-larger rule. A large or awkward pot should remain on a supported surface during the work.
Prepare the mix and planting height before exposing roots
Container mix must manage water and air inside a restricted volume. Dense garden soil behaves differently after repeated irrigation and is not the default substitute for a freely draining medium suited to rosemary. Fresh mix should be workable without becoming a saturated paste; excessive water before planting can collapse pore space and obscure how the new container will actually drain.
Planting height is a geometry problem established before side fill. The old soil line records the crown's previous relationship to the root ball, while the pot rim must retain headspace for irrigation. Those two references determine the foundation thickness. A decorative desire to center the canopy vertically cannot overrule either one.
The root ball is the supported mass in this comparison. Pulling on woody stems transfers weight through the crown and can create a void beneath roots, so the canopy is not a handle or a height-adjustment mechanism. A stable work surface and tools within reach reduce the period during which the mass is unsupported, but they do not change the depth target.
Preparation is complete when the new container, draining medium and intended soil line form a coherent arrangement before roots are disturbed. Test the fit first: the mix must supply the required drainage, and the container needs enough internal height for both the established crown level and usable watering space.
Redirect the root mat with restrained handling
Healthy crowding and root disease demand different interpretations. Firm pale or tan roots circling a coherent ball show a spatial problem: growth has reached the container boundary. Dark, mushy or foul-smelling tissue shows damaged function. Increasing pot volume can help the first condition but may worsen the second by surrounding impaired roots with more wet medium.
The objective with a healthy mat is limited redirection, not visual reconstruction of the entire root system. Outer circles need an opportunity to encounter fresh mix, while the central ball preserves working roots and established soil. A completely opened or heavily reduced mass may look horticulturally dramatic but exceeds the routine described here and increases the recovery burden.
Resistance supplies a scope boundary. Roots that yield with gentle handling fit the redirection problem; dense circles that require limited cutting may still fit when the central mass remains sound. Once the work would remove a substantial fraction or dismantle the ball, the diagnosis and procedure should be reconsidered instead of expanding a modest repot into major root pruning.
Canopy size can make this judgment physically awkward without changing it biologically. The root ball must remain the supported unit because twisting or lifting through woody stems loads the crown. The acceptable outcome is a coherent healthy center, some outer roots able to enter new mix and no abnormal tissue hidden by routine backfilling.
Preserve the old soil line while filling the sides
Repotting changes the container around an established root ball; it should not quietly change the crown's depth. The old surface line is the record of that relationship. If it disappears beneath fresh mix, the crown has been buried even though the pot may look neatly full. If the root ball projects above the new surface, irrigation can run around it and exposed roots can dry.
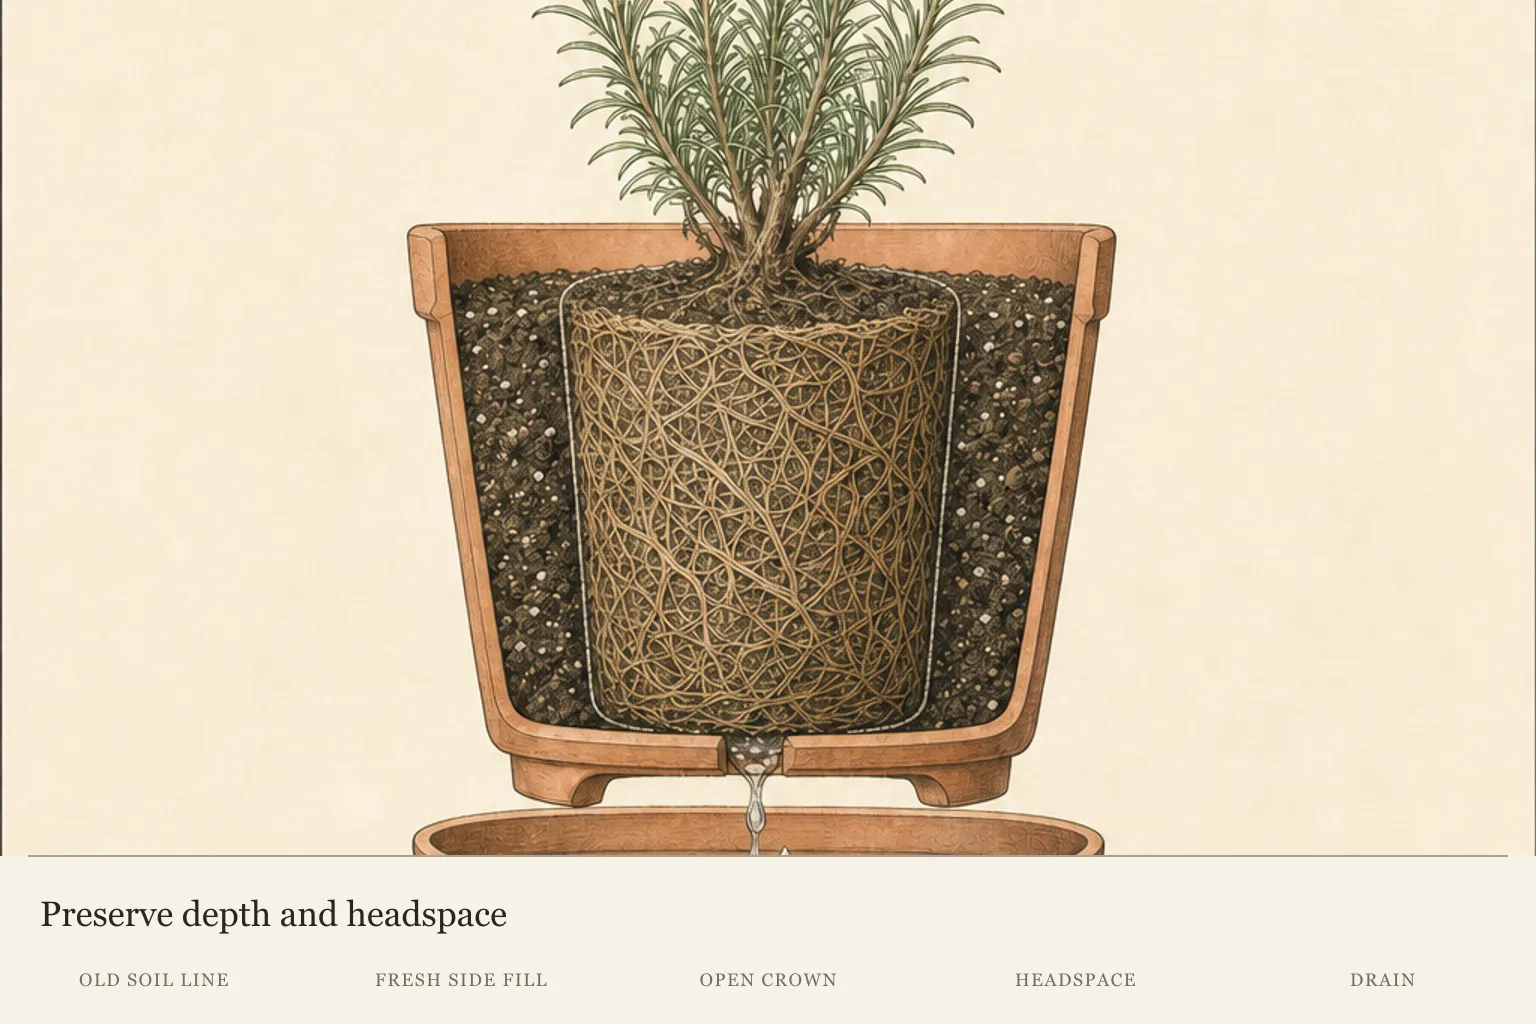
Height is determined by the foundation beneath the root ball, not by the final handful of mix. A ball that begins too low cannot be made correct by disguising its top, and one that begins too high cannot be settled safely by pounding the side fill. Correct geometry places the established surface level with the new surrounding mix while preserving an irrigation space below the rim.
The modest increase in pot size creates a restrained annulus rather than a second independent soil system. That ring should contact the old root ball closely enough to avoid large air voids, yet remain open enough for water and air movement. Heavy compression changes the physical character of the mix and can tilt the plant as pressure accumulates unevenly around the sides.
View the crown from more than one angle before judging alignment. Woody rosemary can lean even when its root ball is level, so the stems are not a reliable substitute for the former soil mark. The aim is stable support with the crown open, drainage unobstructed and headspace available; visual verticality of the canopy is secondary.
The structured step below owns centering and side filling. These principles provide the correction rule: when the old line is wrong relative to the rim, change support under the root ball before the container is finished. Surface camouflage cannot repair a faulty base without creating a new depth problem.
Use the first watering as a drainage and stability test
The first irrigation is the only early event that tests every part of the new container system at once. Water must enter the fresh side ring, contact the old root ball, leave through the lowest openings and stop collecting around the base. The result reveals more than plant thirst: it shows whether the physical arrangement built during repotting functions as intended.
Settling is expected, but its pattern is diagnostic. A small side gap exposes incomplete contact between new mix and the root ball. Movement of the whole mass suggests poor support at the base or uneven side fill. A crown that appears lower only after the soil settles indicates a depth problem that should not be disguised by adding material over the top.
Drainage failure has several possible locations. The medium may be too dense, an opening may be blocked, or an inner pot may be standing in water retained by a cachepot. Those conditions look similar from above because the surface stays wet, yet they require different corrections. Repeatedly adding small amounts of water would conceal rather than distinguish them.
An abnormal odor after wetting also reopens the root diagnosis. Moisture can make previously hidden decay easier to detect, and a larger container is not a treatment for diseased roots. A successful first watering leaves connected moisture, a clear exit path, stable geometry and no new evidence that invalidates the healthy-crowding diagnosis.
Replace the old watering assumptions with a new baseline
Repotting changes the hydraulic baseline even when the plant and weather stay the same. A modest ring of fresh medium adds pore space not yet occupied by roots, and the new container may expose a different surface area to evaporation. The old weekday interval was an observation of the former system; carrying it forward as a rule ignores the change just made.
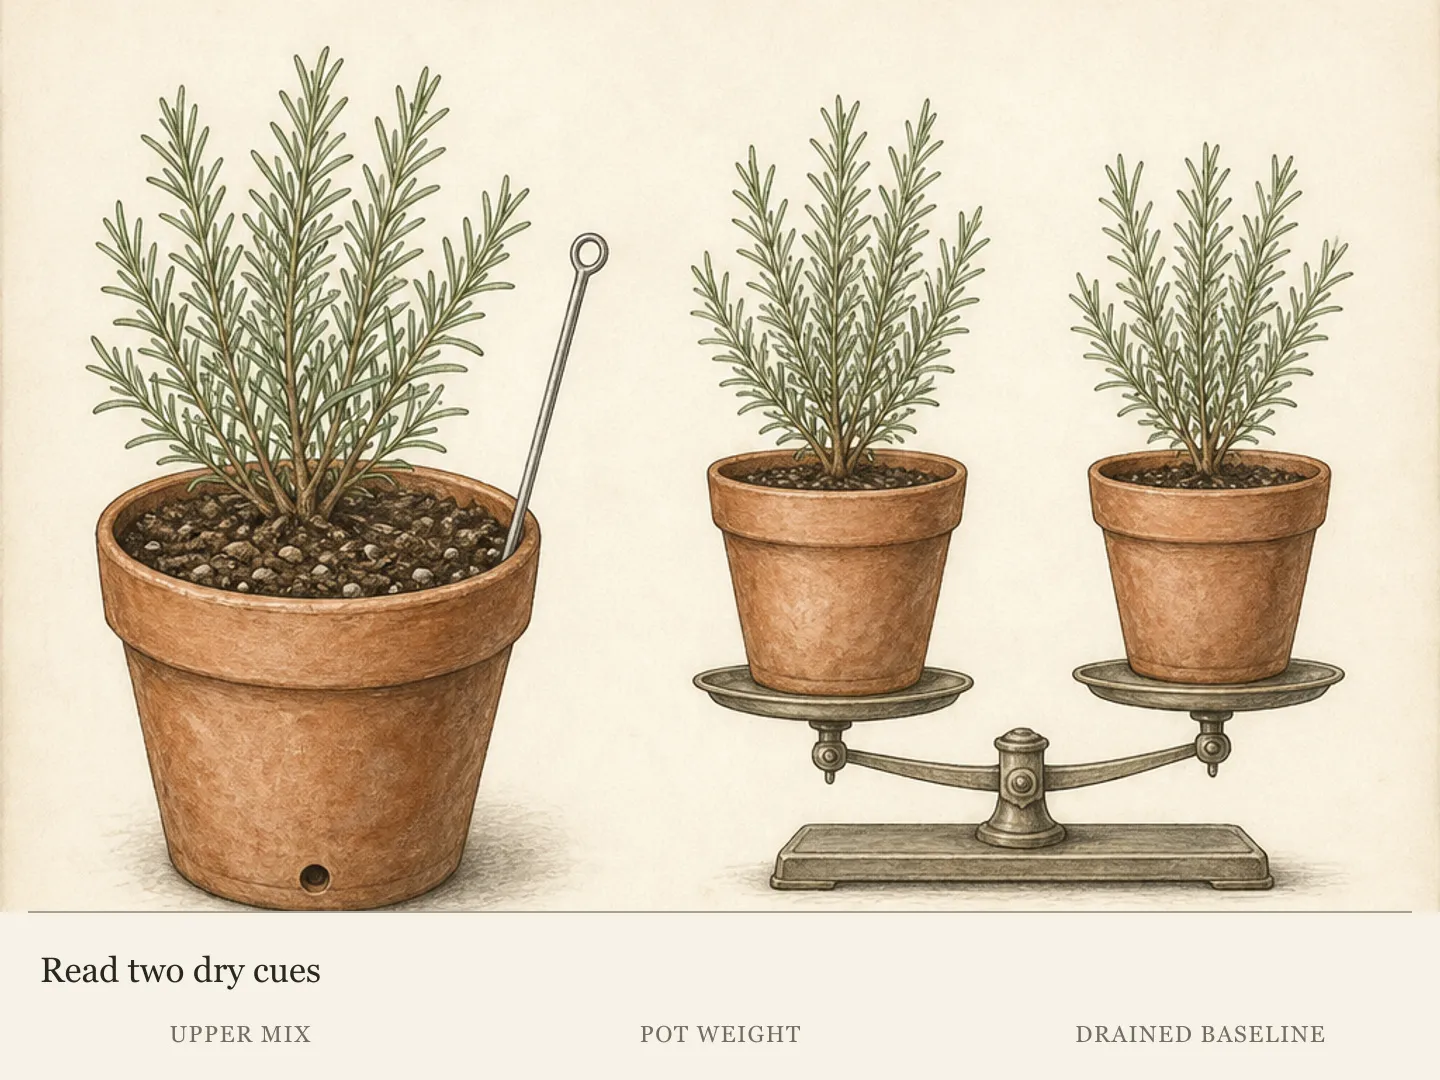
The freshly drained pot supplies a useful reference because weight and surface feel are known at the wet end of the cycle. Later changes can be compared with that state. The visual color of new mix alone is weak evidence: its surface may look dry while the old ball remains moist, or remain dark while drainage and root occupancy differ below.
Stability, free drainage and movement away from the wet reference form a coherent early pattern. When all three occur, the plant can be observed without repeatedly reopening the root zone. If one fails, the location of the failure matters: a wobbling ball indicates support, persistent saturation indicates medium or drainage, and accelerating decline can reopen the original root diagnosis.
Changing several variables at once makes those patterns unreadable. Extra fertilizer, canopy pruning, another repot or automatic top-up watering can each introduce a second explanation for the response. Let the new root–medium relationship establish a clear pattern before applying assumptions carried over from the old pot.
Steps
- Level
- moderate
- Time
- About 30–45 minutes, plus drainage time
- Tools
- Supported work surface, Blunt root tool, Clean sharp cutting tool only if needed
- Materials
- Clean draining container only slightly larger than the old pot, Fresh rosemary-appropriate container mix
- 1Remove and inspect the root ball
Prepare a stable surface and a plan to reuse the current pot if crowding is not confirmed. Release the plant while supporting the pot and root ball, never the stems. Inspect the sides and base for dense circling roots or so little visible mix that roots occupy most of the ball. Return a loose, uncrowded plant to its container. Stop the routine if roots are dark, mushy, foul-smelling, or extensively damaged.
- 2Test a slightly larger draining pot
Compare the confirmed root ball with the usable interior of a clean, stable container. Choose only a modest gap that can be filled with fresh mix, and reject a vessel that leaves a broad unused collar. Verify open drainage holes at the lowest point, then trace where runoff will collect and how it will be removed. A cachepot must not trap water against the inner container.
- 3Set the base height
Use fresh, lightly moistened, freely draining container mix appropriate for rosemary. Add a base layer, lower the supported root ball for a test fit, and compare the old soil line with the rim. Add or remove base mix until the original planting depth will be preserved and useful watering headspace remains. Make every height correction from below before roots are loosened and side fill begins.
- 4Loosen circling roots
Hold the root ball from below and tease the outer mat with your fingers. Unwind and redirect several circling roots toward the future side fill while keeping the healthy central ball intact. Where a firm circle cannot be released, use a clean sharp tool for a limited cut. Stop if the work would become major root pruning or exposes abnormal dark, soft, or foul-smelling tissue.
- 5Backfill at the original depth
Center the supported ball on the prepared base and reconfirm the old soil line. Add mix around the sides in stages, guide it into large gaps, and firm gently without pounding the medium dense. Keep the crown open and the original surface level visible. If the plant sits too low or high, lift the root ball and correct the base; do not repair height by burying the crown or exposing roots.
- 6Water and drain once
Apply water slowly and evenly across the surface until it exits the drainage holes. Let the container finish dripping and empty every saucer or cachepot. Inspect the side fill after settling, adding a little mix only to exposed gaps while preserving crown height and headspace. Confirm that the plant remains stable and that the drainage path works before returning it to its growing position.
- 7Record the new baseline
Note the fully drained weight, upper-mix feel, original soil line, and plant stability. Use that wet state as the baseline for later moisture checks; the old watering interval no longer governs the slightly larger volume. Reassess the pot size, drainage route, fill, and roots without topping up if the container stays saturated, the rosemary loosens, or decline accelerates. Continue only when drainage and moisture change are observable.
Plants in this guide
Related reading
Sources
- Repotting. University of Illinois Extension. Source record · Accessed 2026-08-15.
- Repotting Houseplants. Penn State Extension. Source record · Accessed 2026-08-15.
- Rosemary. University of Illinois Extension. Source record · Accessed 2026-08-15.
- Container Size. University of Illinois Extension. Source record · Accessed 2026-08-15.